Background

Sunday, July 15, 2012

The More Candles...

I made this card for Mum tonight (her Birthday is Monday) - her fav colour is blue so hard to resist using it :-)  The background for the front was made by spritzing water onto distress ink that was inked on my mat, and dragging the cardstock through it. The envelope was stamped 3 times with the Happy Birthday stamp in the hybrid ink.

 And the usual close-up :-) The roses were coloured by sponging the remaining ink/water onto them and then rubbing a touch of baby blue liquid pearls along the edges, then I rolled the wire.

The Chipboard was embossed with Snow Gum Opals, and the 'doily' was hand made by die-cutting a circle - then using my Martha Stewart bubble punch around the edges... Trial and error to line up and there was a bit of a messy overlap at the end but it's hidden by the flowers :-)

Ingredients:
Twiddleybitz - Small Frame (FRA016)
White Cardstock
Tim Holtz Distress Ink - Faded Jeans
Tim Holtz Distress Ink - Broken China
Tim Holtz Distress Ink - Salty Ocean
Hybrid Inks by Palette - Beaux Arts Blue
Stampin' Up - Stamp "the more candles..."
Hero Arts Stamp - "Happy Birthday" E1119
Martha Stewart Punch - Corner - Bubbles
MPress Nesting Dies - Circles (MP-1005)
Ranger Liquid Pearls - Baby Blue
Green Tara Roses - Blue 

Thanks for stopping by 
Jen :-)

Thursday, July 12, 2012

July FWAB Challenge...

Just a reminder to everyone that there's a new challenge on the Flourish With A Bling Blog - you've still got time to get your entries in, here's a re-cap, I really hope to see you join in :-)
Jennifer

It’s a colour challenge!!
~Take inspiration from the colour palette to create your project. Black and white is also allowed to be used in creating your project. The best thing about Flourish with a Bling is that they have a large range of stunningly rich colours, I really wanted to showcase this by choosing a colour challenge.

Flourish With a Bling Challenge Rules
- You are required to use Flourish With A Bling products on your creation;
- You are required to use the above colour palette as inspiration for your entry;
- You are required to upload your entry into the Flourish With A Bling Gallery in the appropriate category.
- You can create a card, layout, OTP, home decor, anything you like;
- Challenge closes midnight , Tuesday 31st July 2012;
- You can enter as many times as you like;
- You MUST have fun!
PRIZE – a fantastic pack of Flourish With A Bling goodies perfect to scrap more fabulous layouts or cards!!
This challenge was a lot of fun and our Design Team has really done a beautiful job. Many of the Design Team members will be sharing their samples of this challenge on their own blogs during the month too, so make sure you check them out.
Thanks for stopping by, the team and I cannot wait to see your projects in the gallery this month!! We had such an overwhelming number of entries last month, it made us really happy to see so many talented ladies joining in!!
Love Kate xo

Wednesday, July 11, 2012

She's Got "The Look"...


I love this photo of Erin - it's so me, and so my mum, and so her mum... that look over the glasses has been passed down through the generations!

I started out with perfect pearls, water, a minimister, dusty concord distress re-inker and the butterfly WOW Altamatz.  I love how this template changed my background!  I also sprayed my big flower with the purple spray and used my Martha Stewart corner bubbles punch to alter it - I love how effective this is and will be trying a few more on my flowers down the track!

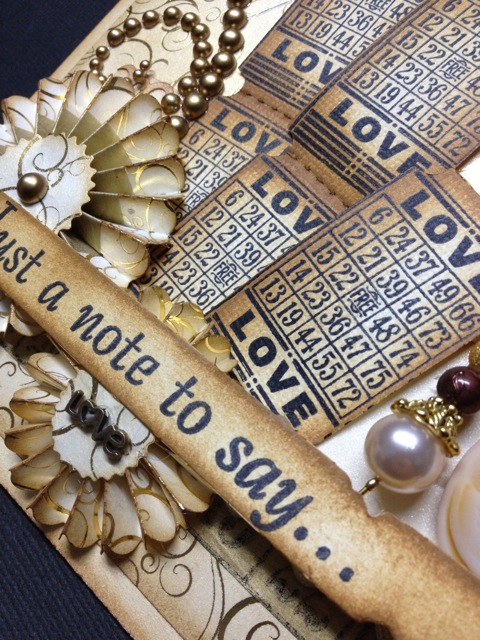
Add some patterned paper from AED; some ribbon from Geen Tara; and some gorgeous Flourish With a Bling Purple Chloe Pearls; some more My2Angels flowers and a rose charm.  I also couldn't help using the gorgeous flowers from Manor House Creations. I couldn't go past using my beaded pin and the next dilemma I had was the journalling!

Too many times these days I see 'pretty' layouts that are just that - pretty, but they don't tell the story behind the photo.  I used to teach people that one of the main things with scrapping your photos was you no longer had to sit and explain every shot and your thoughts about it..but somewhere in the last 10 years, journalling seems to have been forgotten more often than not!  A great inspiration to me when it comes to journaling is my long-time friend Peg Hewitt.  Peg is an extremely talented scrapper who never omits the important stuff - journalling!  So inspired by Peg - I got my Dymo labeller out.  I used the paper to paper cartridge and printed out my journalling.  The only problem was - it was still white!! I decided it would be awesome if it was purple, but since I didn't have purple tape - I would have to make it purple!  I used Tim Holtz' sponging technique with distress ink and 'purples' my dymo journalling!  I had to wait a bit for it to dry before sticking down - but well worth the wait i think!

Thank you for stopping by and I hope you feel inspired to create, to journal, and to hopefully try some new techniques!!
Ingredients:
Cardstock - White Bazzil Linen
Patterned Paper - A Formal Affair Lounge Suit Music by Alison Ellis Design
Perfect Pearls - Grape Fizz
WOW Altamatz - Butterflies
Flourish With A Bling - Chloe Purple Pearl Flourish
Manor House Creations - Ballroon Waltz (Purple Lace Flower)
Manor House Creations - Country Lane - Purple
Martha Stewart Punches - corner bubbles
Crochet By Kim - Beaded Purple Bow Pin
Green Tara - Assorted Ribbons
Tim Holtz Distress Ink - Dusty Concord (my FAVOURITE colour)
Tim Holtz Distress Re-Inker - Dusty Concord
Dymo Labeller - Paper Tape cartridge, italic font, second largest font
Stix2Anything - Double-sided Tape

Thanks again
Jen :-)

Sunday, July 1, 2012

Note Pad +

I have wanted to make my own notepad for a while.  I thought that if I cut enough diecuts, stacked them, and hot-glued the straight edge that i would have a notepad.... It worked a treat so of course then I had to make a little cover for it!

So from normal copy paper I cut about 40 die cuts and put them together, put hot glue along the straight edge and wiped it along my mat before patting it "in" with my finger.

 Then I trimmed off all the excess glue!

 And then made this cover:

 And inside:

I'm happy with how it turned out :-)

Ingredients:
Cardstock - light and dark blue
Copy Paper
MPress Nesting Die - Ornate square (actually a rectangle)
Martha Stewart Bubble Punch
Kaiser Clear Stamp - Friendship Sentiments
Palette Hybrid Inkpad - Beaux Arts Blue
Stix2Anything - Double-sided Tape

Thanks for stopping by - it's a fun project, let me know if you try it too!
Jen

Just a note to say...

I really love brown, cream, and gold :-)
I was given these fabulous new stamps to trial by the lovely Tracy at My2Angels - they are from Kaiser and fit OMG so perfectly into the ticket stub die from Tim Holtz.  The card was basically created around them!

I also got to use my gold washi tape and stamp on that across the bottom of the card although you can hardly see - and use it in the centre of the large rosette.  I added a beaded pin from Crochet By Kim and some Flourish With a Bling pearls of course!  I also added a charm of Tracy's and one of her gorgeous Cameos and used my banner die, tab die, and new Martha Stewart bubble punch too!

And inside...
And the usual closeup :-)
Ingredients:
Twiddleybitz Cream Shimmer card
White cardstock
Alison Ellis Design Patterned Paper
Crochet by Kim - Antique Pin
Kaiser  Miss Match - Bingo Cards clear stamps from My2Angels
Gold Washi Tape
Distress Ink - brushed corduroy and vintage photo
Tim Holtz Tattered Banner Die
Tim Holtz Rosette Die
Tim Holtz Tab Die
Tim Holtz Ticket Die
Stazon Black Ink
Cream Ric Rac
Martha Stewart Bubbles Punch set
Miscellaneous stamp - Just a note to say...
Stampin Up stamp - You're never more than a thought away

Thanks for stopping by!!
Jen