Background

Showing posts with label ATC. Show all posts

Thursday, August 23, 2012

Cherish Butterfly ATC

Yep - another ATC, this time using some gorgeous aged ivory embossing powder on a Twiddleybitz Butterfly - note the background is made with alcohol inks and a new brick template from none other than........ Twiddleybitz!!!  CHERISH has been traced in Onyx Liquid Pearls. The edges have a scraping of gold paint from the dabber to bring some definition.

Ingredients:
Art Spectrum - ATC's
Twiddleybitz - Brick template (TEM007)
Twiddleybitz - Butterfly Multi 7 pack (BUT007)
Flourish With A Bling - Pearls - Antique Gold
Ranger Alcohol Ink - Pebble
Ranger Alcohol Ink - Butterscotch
Ranger Alcohol Ink - Hazelnut
Ranger Alcohol Ink - Gold (mixative)
Distress Ink - Tea Dye
Stazon Ink - Timber Brown
Adirondack metallic Dabber - Gold
Liquid Pearls - Onyx PearlsEmbossing Ink
Stampendous - Aged Ivory Embossing Powder
Kaiser Clear Stamp - Cherish (CS831)
Glossy Accents to adhere

Thanks for stopping by - don't forget if you'd like to swap an ATC - let me know :-)
Jen

Wednesday, August 22, 2012

Another ATC

Couldn't resist making another ATC with the love and key theme... am really loving 'splatting' my distress dabbers!!

Ingredients:
Art Spectrum - ATC's
Twiddleybitz - Brick template (TEM007)
Twiddleybitz - Vintage Keys (VTG005)
Distress Ink - Tea Dye
Distress Ink - Vintage Photo
Stazon Ink - Timber Brown
Embossing Ink
Stampendous - Aged Black Embossing Powder
Darkroom Door Stamps - Keys (DDRS092)
Kaiser Clear Stamp - Botanical (CS795)
Glossy Accents to adhere

Thanks for stopping by - and don't forget to let me know if you'd like to swap an ATC with me :-)
Jen

Monday, August 20, 2012

Love is the key ATC...

I love ATC's.  I like the challenge of creating in miniature, and I like the thought that someone likes my work so much they'd like to own a little piece of it!  I made this ATC using the most gorgeous little keys from Twiddleybitz and some awesome new embossing powders by Stampendous...

I made this while at My2Angels the other day scrapping with the lovely Ann Lavin and Tracy Kielty.  I had a picture in my head of how I wanted it to look, so once I raided Tracy's stash it didn't take long to create :-)  I've swapped this ATC with Ann Lavin already :-)

Ingredients:
Art Spectrum - ATC's
Twiddleybitz - Brick template
Twiddleybitz - Miniature Keys (miniature of these)
Distress Ink - Tea Dye
Distress Ink - Vintage Photo
Momento - Black Ink
Embossing Ink
Stampendous - Aged Black Embossing Powder
Darkroom Door Stamps - Keys (DDRS092)
Kaiser Clear Stamp - Botanical (CS795)
Glossy Accents to adhere

Thanks for stopping by - if you ever want to swap an ATC with me, just let me know :-)
Jen

Wednesday, August 15, 2012

Yipppeeeee

I am so excited to finally be able to share with you all, that I've been accepted as a member of the Twiddleybitz Design Team and a Product Ambassador for another year!!
I look forward to working with Nic and Andrew again and of course the fabulous Twiddley Angels! Please welcome the rest of the team:


To celebrate I thought I'd look back over the past 18 months or so and pick a few of my favourite Twiddleybitz projects...  Most recently my TopHat and the Lover's Garden, but besides those...

I LOVE this layout and my beautiful boy of course.

These techniques are all me! (unfortunately the photo is too!)

Love how beautiful this one is - made for my mum

My sense of humour is shining through!

A class I taught on the Gold Coast with the fabulous wishing well...

For a friend's grandbaby :-)

Again - these techniques are me to the core...

One of many cards - this one created in the wee hours of the morning during one of the Brisbane shows!

More Brisbane show creations - this a Christmas ATC..

My most favourite stamp ever - stamped into coloured thick embossing enamels...

One of many ATC cupboards...

and another...

and another...

House warming card - made in the hopes I could give it to myself if indeed no13 was to be rented to us!

 One of my all-time favourite cards:

Oh - and ANOTHER ATC cupboard!!

If you've managed to get to the end of this little trip down memory lane... congratulations!!!  I guess you've figured out now I cannot pick just a few, although there are many I did not pick!  I'm sure that it shows just how much I LOVE Twiddleybitz products and how great they are to work with!

Thank you so much for stopping by and taking the time to read my blog and see my creations.  I do hope I have inspired you to create some Twiddleybitz of your own!

Jen
:-)

Saturday, June 16, 2012

Cherish

Cherish - something we should all do with the "little" things in life..... 
so here's a "little" something to remind me...

A close up of the gorgeous Twiddley butterfly all bling'd up!

This was my first ever time using Prima flowers - I can now understand the hype, but I still cannot understand nor justify the outlay.

Ingredients:
Twiddleybitz ATC Shadowbox - SBS001
Tim Holtz Distress Stain - Peeled Paint
PipeDreamINK - Daintree opals
Stazon Ink - Black
Tim Holtz Distress Ink - Antique Linen
Stampin Up Stamp n Write - Garden Green
Twiddleybitz Butterfly Pack
Tim Holtz Distress Crackle - Tattered Rose
Distress Stickles Rock Candy
Flourish With A Blink - Adhesive Pearls - Copper
Prima Flowers - Bretton Vines, Alyssa
Art Spectrum ATC

Thanks for stopping by - I hope you too can remember to Cherish the "Little" things :-)
Jen

Thursday, February 2, 2012

Lace Cupboard

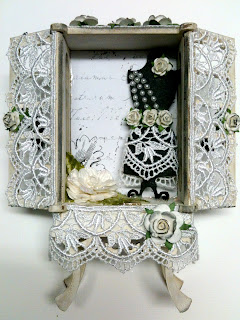
I was asked early in the New Year to make another musical cupboard.  The brief was black and white, vintage, fashion...  I like how this one turned out.  The lady whom ordered it was very happy and I'm sure the recipient will be too if the lady's reaction is anything to go by!!


Outside - before adding the musical winder at the back:


With the doors open:


A close-up of Miss Mannequin:


I quite enjoyed this project.  I hand made the large flower inside by using similar techniques to those shown in this youtube video here for the Tim Holtz Grunge Roses.  The flowers were 5 x 3.5cm white mulberry flowers from the My2Angels White Mulberry Flower Paper Pack, then I added the leaves that I coloured with Distress Inks.


Ingredients:
Twiddleybitz - ATC Cupboard
Twiddleybitz - Vintage Miss Mannequins (VTG001)
Bo Bunny - Enchanted Patterned Paper
My2Angels - White Mulberry Flower Paper Pack
Tim Holtz Distress Crackle Paint - Picket Fence
Tim Holtz Distress Inks - Black Soot, Peeled Paint
Tim Holtz Distress Stickles - Clear Rock Candy
Stazon Ink - Black
Kaiser Pearl strips
Green Tara Lace
Miscellaneous Bead Chain


Thanks for stopping by!!

Saturday, December 3, 2011

Another ATC Cupboard

I was asked to make this one as a Christmas Gift for someone - quite girly and pretty...

I love these Twiddleybitz ATC Cupboards - in case you didn't already know!!


Thanks for stopping by :-)
Jen

Sunday, November 6, 2011

At the Hop...

Hello and welcome to my leg of the Twiddleybitz Blog Hop.  Thank you so much for joining us - if you happened upon this hop by mistake, stick around, you’ll be blown away by the fantastic work the Design Team Angels have been creating, I certainly have been!  You can find the schedule here, and then first up with the wonderful Mel Forbes :-)
Thanks to Nic and Andy from Twiddleybitz for having such fabulous CHIPBOARD  products to work with and for developing new products constantly - it’s a pleasure and privilege to work with you and for you.
Throughout the hop you should have been collecting the secret words - usually highlighted (not exactly subtle in the process either!) or bolded...  When you have them all, you need to head back to the NING to send the phrase to the lovely Sandra Wallace by private message.  You will go into the draw to win a Fantastic Twiddleybitz CHIPBOARD prize pack of your very own!!
Each of the Design Team Angels have also been offering Twiddleybitz CHIPBOARD RAKs for people who comment on their blog hop posts - some with conditions - like you have to use their secret word in your comments - I must say we have some very creative people joining us in the blog hop!!
I have been addicted lately to creating the gorgeous ATC Cupboards that were released a little while ago.  I have now made four!!  This last one I made, I experimented and have created a technique I have been playing with for a while now.  

I am a wood girl - The furniture in my home is wood and I love the natural tones of nature... After making 2 black and 1 white cupboards I was “champing at the bit” to create this one.  I  will go through it step by step for you,  I am so excited to share this!!


step 1 - use a eyelet punch to form the 'knots' in the wood - you need to do this to both sides of each piece as you will see front and back of most of them.  Don't do too many!
step 2 - Use a brown marvy marker or similar to create the grain - work in one direction - the direction you think the wood would be cut in - on a real piece of furniture.
Step 3 - create shadows and depth by using black soot distress ink and an empty squash pen(you could use a fine paint brush as an alternative).
Step 4 - blend and colour using vintage photo distress ink and a sponge.

Step 5 - re-define any areas where the grain is unclear.
Step 6 - coat every surface with an even layer of mod podge or similar - allow to dry and repeat for 3 coats for best results.  When applying - use  a thin brush and the brush strokes to emphasise the grain of the wood.
step 7 - use the instructions enclosed with the cupboard for assembly - don't worry, it's easier than the IKEA flat packs!
step 8 - attach the inside paneling of the doors (I have used a printed transparency from Kaiser, making sure the pattern is the right way up and the clocks on either side meet up correctly), and then repeat for the inside panels for the sides of the cupboards (I have used the Kaiser transparency again).  I used dimensional magic to adhere the transparency as it dries clear.
Step 9 - Use a hot glue gun to add the beads as door knobs.
Step 10 - Fill your cupboard with ephemera or Twiddleybitz CHIPBOARD of your choice, attach bling and decorations on the outside if you wish.
Step 11 - use the hot glue gun again to attach the music box mechanism to the lower back of the cupboard.  (Mine plays “Happy Birthday”)
Step 12 - Counter weights will be needed as the mechanism is heavy.  Use 2 size 6 sinkers - underneath in the front corners, adhere them using the hot glue gun again.
I do so hope I have inspired you today.  Please share your creations with us in the NING gallery and join us shortly in the forum for the closing of the Twiddleybitz Hop.  I will be ‘hopping’ over there shortly because I have a surprise for you all!
I have a number of questions for you - all related to the Hop.  Find the answers and send them to me via a private message in the NING forum and you will go into the draw for a Twiddleybitz RAK from me!!!  Also - in case you didn't know, you can chat to us via the heading "Twiddley Chat" on the Ning whenever we're online!!  hint hint - NOW!!!!!

Please be sure to leave me a comment and use that secret word!  All those who do and are 'followers' of my blog will go into the draw to win another secret RAK from me!!!!
Thank you so very much for stopping by - it’s been fantastic!!


Sunday, October 30, 2011

Anther ATC Cupboard!!

Yep - I've made another one!!  This time for a young lady's 18th birthday.  
The brief was: Black, Red, Silver, "a bit gothy'.

I coloured the cupboard in black stazon - painted from the re-inker, it's SO much easier than painting everything!

I used the organza ribbon instead of the transparency on the front doors for something different and managed to bow each door and they sit nicely when the doors are closed...

Inside some Flourish with a Bling, a Tim Holtz rosette die and part of the MFT Die-namics dies with the ever gorgeous red roses from Green Tara...

And another wonderful Flourish in the back of the cupboard, topped off of course with some AED glitter!

a pin from My2Angels, add a rose, glitter and some feathers - makes the door a bit of an eye-catcher...

If you haven't tried these little cupboards - you simply must. Twiddleybitz have really thought of everything with regard to the design, they come with assembly instructions and photos too so it makes it even easier to use!  I have done a number of these now and have orders for two more!!

As part of the annual Christmas Blog Hop for Twiddleybitz this coming weekend (held in conjunction with the Australian Papercraft Festival in Sydney) I will have a SUPER project to show you, with a fantastic new technique - and some blog candy!!  All the action starts in the Twiddleybitz NING Friday - 4th of November 2011.

Thanks for stopping by - I hope you enjoyed this project, I look forward to seeing you again soon!

Friday, October 14, 2011

For Sheridan

This is the ATC cupboard I made for Vicki to give her BFF Sheridan for her birthday.  It was one of my projects for my Guest Design Team spot at Flourish With a Bling. I hope you like it - I had heaps of fun making it!  I have included the 'ingredients' list below.


Ingredients:
Twiddleybitz ATC cupboard and heart
Stazon white re-inker
Flourish With a Bling Clear Diamonte's
Green Tara Roses, jewelled flowers, silver bow
Alison Ellis Design Glitter - midnight
 Kaiser Transparency
White C/Stock
Birthday Stamp by Stamp It
Black Stazon ink
Black Soot Distress Ink
Spellbinders Die
Glossy Accents
PVA glue
Hot Glue Gun
Musical Wind-up

I will blog more info on the other items in my Flourish Guest Design Team Member Post tomorrow :-)
I also have some great news to share with you - there's a blog hop on the horizon..... and of course - prizes and competitions too!  So excited!

Thanks for visiting!

Saturday, September 24, 2011

Another Music Box - Happy Birthday Vicki!

After the other music box - Ian commissioned this piece as a birthday 'card' for his sister.. She loved it so much she has now commissioned me to make one for her BFF!!.

I hope you like it - The Twiddleybitz ATC cupboard was the perfect fit...