Background

Showing posts with label Green Tara. Show all posts

Saturday, May 18, 2013

Pink Hanger OTP and 18% discount!

I had a lot of fun creating this Project.  I have just found this draft with the images but no details.  There is a lot of product here but I can tell you most is available from My2Angels.

The best news is that until midnight Sunday (that's tomorrow night!) you can get 18% discount by noting "BIRTHDAY" as the code through the checkout!!!   Spoil yourself, get a bargain, and don't forget to check out Tracy's handmade charming chains, dates, and embellishments!!


Friday, December 14, 2012

TWBZ Wreath Card

I had so much fun making this card and it all started with a few branches!!


Intructions:
First I sprayed the leaves both sides with green sparkly spray:
 Then I cut a wreath using two circle cutters through my bigshot:
 I cut the leaves so they were separate parts and gave them another spray to really sparkle:
Once dry, I laid the leaves out and began attaching them to the wreath:
 I had a few spare:
 Then I added some bling for berries:
 And a bow at the top (that I later changed to white):

Ingredients:
Cardstock - red
Cardstsock - white embossed
Red Green and White striped Ribbon
Green Tara - White pre-tied bow
Twiddleybitz - Alpha Square (ALP004)
Twiddleybitz - Fern Leaves Set of 4 (FER001)
Flourish With A Bling - Adhesive Pearls - Red
Lindy's Starburst Stain - Green Goblin
Adhesives by Stix2Anything


Thanks for stopping by - I hope to see you creating wreaths of your own - let me know when you do!!
Jen
:-)

Monday, December 10, 2012

Santa's Mailbox

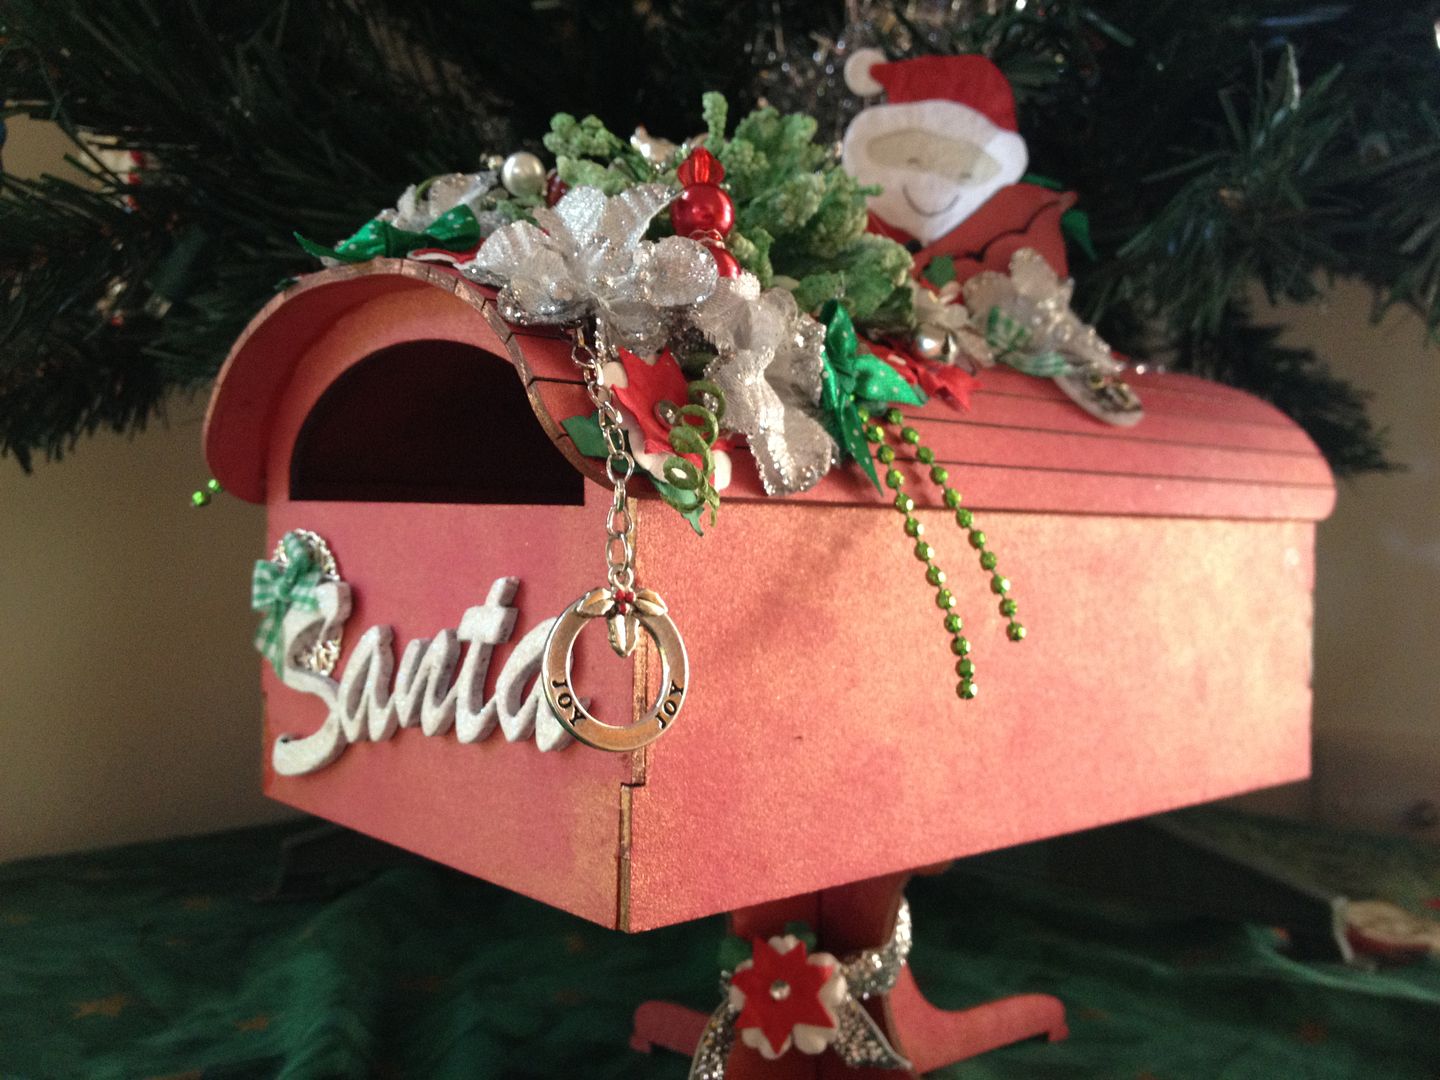
When I saw these new mailboxes from Twiddleybitz I just had to have one right away!  I started on it the second night I had it and colour-sprayed it first thing! Unfortunately I had to put it (and creating in general) aside for a while but I finally managed to finish it the other night.  I am quite please with how it turned out.. I got to use some of my favourite products and I love that I stuck to traditional red and green for Christmas.
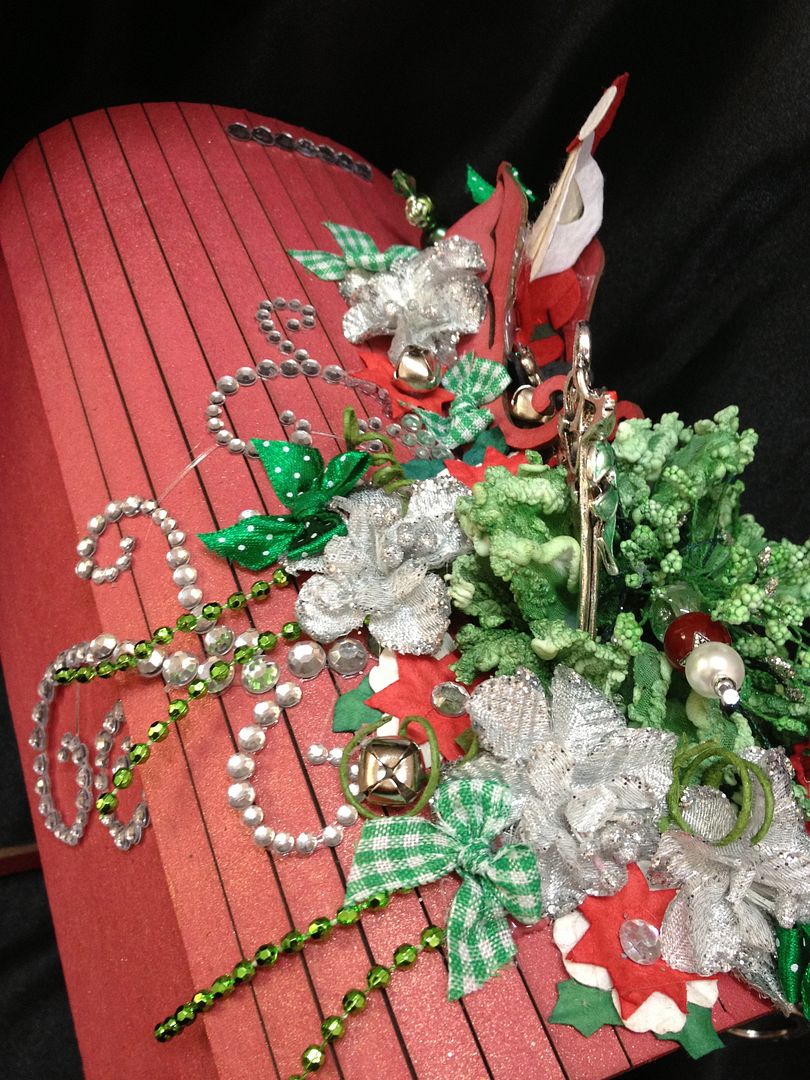
I followed the instructions sheet that was included to assemble and started gathering flowers and embellishments to decorate the top.  I started with the gorgeous Elise Flourish:
I made the small Twiddleybitz sleigh - added Santa and made Rudolph a bit fancy with my liquid pearls. I sprayed the Manorhouse Creations flower with the green colour spray from the halloween Lindy's Starburst pack:
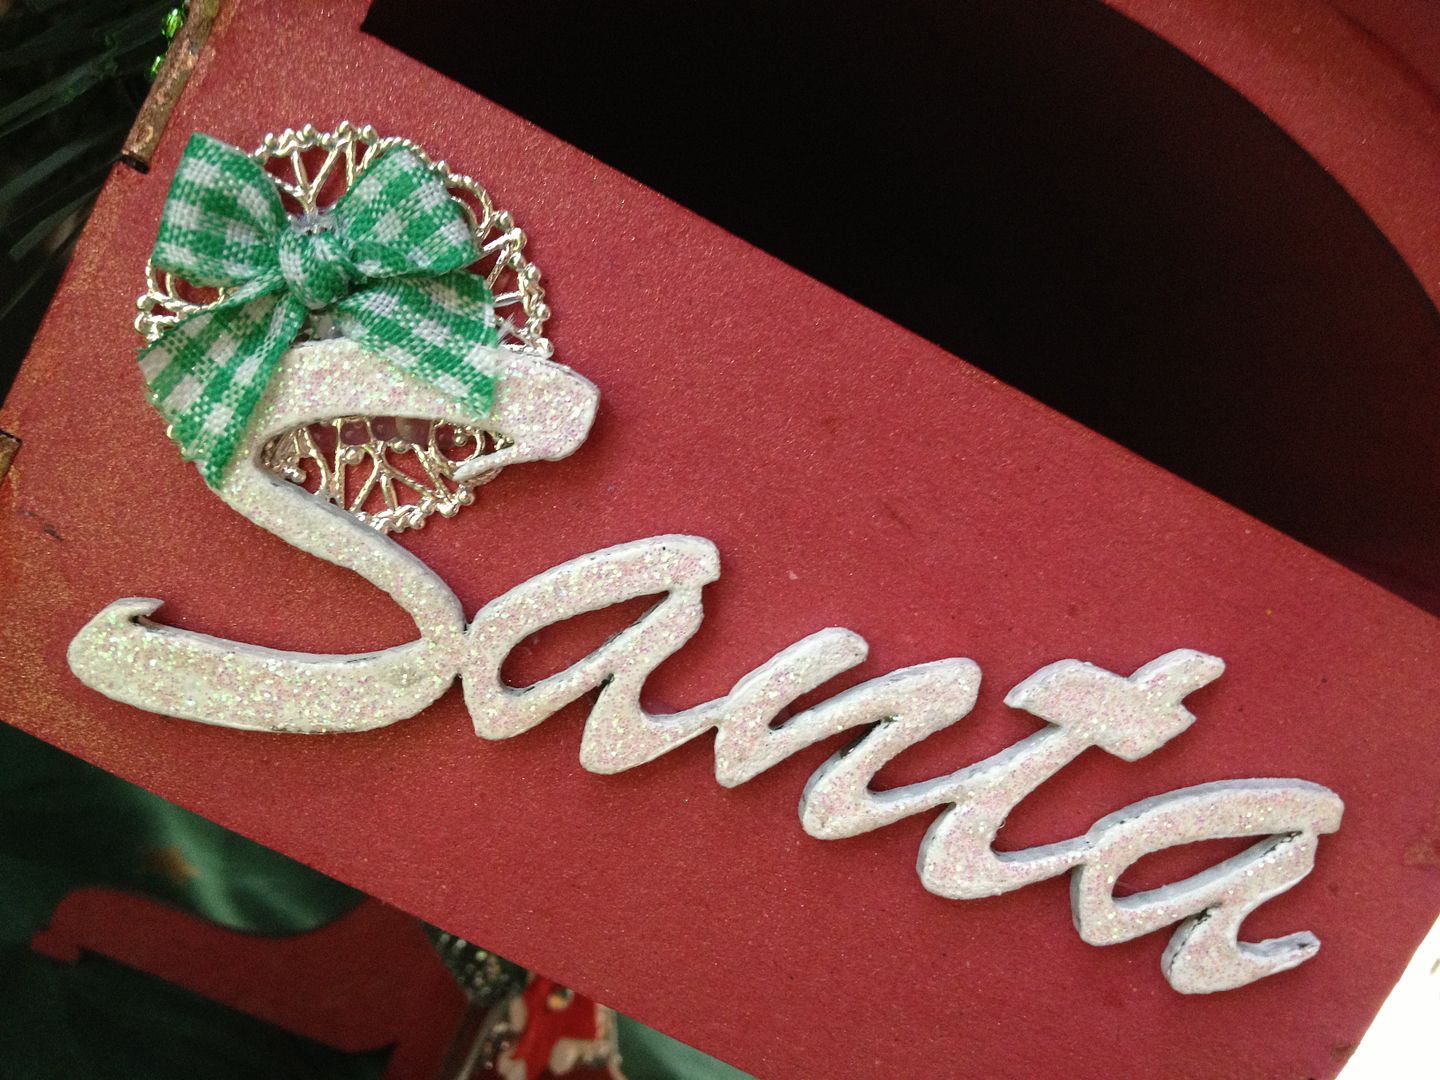
I covered the "Santa" with White Opals embossing enamels and completely covered in kindy glitz, it took a while to dry - then attached it with the embellishments from My2Angels.
Then I tied some matching ribbon around the stand and added a leftover flower.

Ingredients:
Twiddleybitz - Mail box Kit
Twiddleybitz - Santa word
Tattered Angels Glimmer Mist - Red nosed Reindeer
Lindy's Starburst - Freaky franken-lime
Manorhouse Creations - Winter Song - Log Cabin (lrg green flower)
Manorhouse Creations - small silver flowers
Flourish With a Bling - Elise Clear Rhinestone Flourish
Flourish With a Bling - Clear Rhinestones
Crochet By Kim - beaded pins - (Christmas set of 3)
My2Angels - all charms
My2Angels - all bows
My2Angels - all ribbon
My2Angels - all mini bells
My2Angels - Rudolf
Ranger - liquid pearls, ruby red and mint green
Pipe DreamINK - opals, snowgum
Matisse Derivan - Kindy Glitz, christalina
Green Tara - Santa die cut
I also used PVA by Stix2Anything to assemble the sleigh and mailbox.

I hope you like our new mailbox for our Letters to Santa!
Thanks for stopping by -
Jen
:-)

Sunday, September 30, 2012

Trick or Treat?

In Australia, Halloween is becoming more and more popular, not for it's origins - but more for the fact that it's a chance to have a fancy dress party and eat too many sweets!
When I was asked to create some Halloween items, I jumped at the chance and my immediate thought was some off the page treats...  what better inspiration than lollipops, adapted from the lovely Tracy at My2Angels! Please click THIS link to see her beautiful work.
Anyhoo - here's my take on Halloween Lollipops...... Doily-Pops!!!


 And individually for you:

1.


1.  The Spiderweb Halloween Doily-Pop:

  • The orange cardstock rosette is actually two taped together, I punched holes in them with an eyelet setter before assembling.

  • The metal doily/flower has been heat embossed with gorgeous Stampendous Aged Embossing Enamel - Black from My2Angels.

  • The Spider's eyes and bottom have been coloured using Pumpkin liquid pearls.

  • The double bow was made using my fingers like a "bow easy" tool.

  • The black swirls on the flower are a Jasmine Puffy flourish in black that has been cut in pieces to fit petals.

  • The Skewer is the lollipop stick and has been coloured with Black Stazon Ink.


Ingredients:

Kebab Skewer


Black Stazon Ink


Miscellaneous Spotted Ribbon


Flourish With A Bling Black Jasmine Puffy Flourish


Flourish With A Bling Black Pearls


Miscellaneous Orange flower


Spider Charm from My2Angels


Pumpkin Liquid Pearls from My2Angels


Metal Flower from My2Angels


Tim Holtz Rosette Die x2


Bazzil Linen - Festive


Tim Holtz Black Soot Distress Ink


Eyelet hole punch - normal size


Green Tara spider web ribbon


2.


2.  The Orange Doily Halloween Doily-Pop:

  • The Orange Doily has been coloured with Tim Holtz Spiced Marmalade Distress ink.

  • The Black Doily is a diecut from Die-Namics

  • The orange cardstock rosette is actually two taped together - inked on the edge with black soot distress ink.

  • The metal doily/flower has been heat embossed with gorgeous Stampendous Aged Embossing Enamel - Black from My2Angels.

  • I have added Black Pearls on the flower - 3 sizes, largest to smallest, outside to inside.

  • The Spider's eyes and bottom have been coloured using Pumpkin liquid pearls.

  • I kept the bow in place with wire and added the black tassel.

  • The Skewer is the lollipop stick and has been coloured by sponging Black Soot Distress Ink.


Ingredients:


Kebab Skewer


Miscellaneous Spotted Ribbon


Flourish With A Bling Black Pearls


Miscellaneous Orange flower


Spider Charm from My2Angels


Pumpkin Liquid Pearls from My2Angels


Metal Flower from My2Angels


Tim Holtz Rosette Die x2


Bazzil Linen - Festive


Tim Holtz Distress Ink - Black Soot


Dienamics Open Scallop Doily


Black Cardstock


Small white paper doily


Tim Holtz Distress ink - Spiced Maramalade


I hope you like my creations. These were SO much fun to make I have made some birthday and Christmas ones as well!!  Please leave me a comment or tag me on facebook if you decide to make some - I would love to see what you create :-)
Thanks for stopping by
Jen
:-)

Monday, September 3, 2012

Gold Powder Frame

I made this little frame while product testing for Twiddleybitz...


Twiddleybitz Metallic Powders
Recently I was very lucky to get my hands on these very new metallic powders, I couldn’t wait to have a play and discover ways to add that bit of sparkle to my projects!  The first thing I did was use the Binding Solution that accompanies the powders and this is by far the easiest and best medium I used.  It gives a beautiful finish and is easy to use.  
  • The binding solution, multi-medium gloss, glossy and crackle accents all had no rub off as the powders were suspended in the medium.
  • The Perfect Medium and Versamark ink I brushed the powder on while wet and although I sprayed with water and spray fixative after - disappointingly, there was rub off.
  • Modpodge gave an interesting effect - the powder mixed well but I also noticed an interesting starbust effect when just sprinkled on the top of the wet modpodge.
  • Inks had no binding or holding power for the power at all.
  • Brushing the powders onto double sided tape worked a treat - a lovely concentrated shine.
  • One scoop with the paddle pop stick suspended in a half full minimister had almost no effect when sprayed onto the chippy, but painting it one had a better effect - although a small, acceptable amount of rub off when dry.
  • Various mixes of stazon re-inker and powder were unsuccessful as the powder sits on the surface and the ink soaks in.
  • Mixing the powders with the new xpress-it clear gel and ordinary PVA also were successful - with no rub-off once dry.

Once I was happy with the various ways to mix the powders, I decided to experiment with using them on different surfaces, using different techniques.
  • Painting was the most obvious method, perfect for chipboard - a basic mix of 1 paddle pop stick scoop and approximately 6 drops of solution gave the painted finish you see on the lamp post - smooth, and paint like.  The swirls around the frame were made by increasing the ratio of powder to solution - 2:1, and blotting it on with the brush.
  • The metal butterfly charm was painted with the basic mix and then lightly sanded - there is no rub off or smudging and the gold is so brilliant the bling appears dull in comparison!
  • The large cream flower also was painted by the brush - you notice the thicker areas... The lighter area were actually coloured using a sponge on a handle - similar technique to distress inks on the sponge.  The mix must be done on your non-stick mat though. 2 cap taps onto the sheet with 9 drops of solution, mixed with the sponge and then applied to the flower - the orange flower also has this technique.
  • The Carriage has a different finish to the lamp post - it was also sponged.  This was very quick to completely cover.  The powder and binding solution mixture is quick drying - another thing I like about it!
  • I also used the sponge to apply the mix to the lace you see in the background and to sponge around the edges of the stamped greeting. Again the same sponging technique was used on the “explore” tickets.
  • The mixture is also fabulous for using on tumbled glass as you can see from the pendant, AND once dry you can stamp on the surface with permanent ink!
I found the accompanying binding solution was the easiest product to use the powders with.  The mixture allows for application to a variety of surfaces and is fast drying.   This is a product I would buy and use; if only there were more colours were available!

I hope you have learnt something new as I certainly did!
Thanks for stopping by!
Jen


Monday, August 13, 2012

A for Effort

Am so proud of my babes for trying hard at school this year.  Unfortunately this year Queensland school children were marked more harshly than in other years - bringing them in line with the other states.  Right or not, many of the children I know were devastated by marks on their reports that were a grade lower than they (or the teachers) expected.  Cameron has come from a failing and repeating school - changing schools to last year being a B student with 8 A's for effort and achievement, to this year being a C student across the board.  The effect on him has been the most heart-breaking to witness, knowing how truly hard he's worked to improve.

This card was made with him (and all the other devastated kids) in mind.
I love you cameron - and I am SO PROUD OF YOU.
Ingredients:
Twiddleybitz - C6 Kraft card and envelope (C6C003)
Twiddleybitz - Circle Doily Frame (FRA018) 
Twiddleybitz - Box Set Letter - A (TAB00A)
Twiddleybitz - Itty Bitty Alpha - Black (ALPHA005b)
Cardstsock - Black, and White
Darkroom Door - Word Block Congratulations (DDWB002)
Stazon Ink - Jet Black
Stazon Ink - Timber Brown
Tim Holtz Distress Ink - Vintage Photo
Tim Holtz Distress Ink - Brushed Corduroy
Ranger Alcohol Ink - Pebble
Ranger Alcohol Ink - Butterscotch
Ranger Alcohol Ink - Hazelnut
Ranger Alcohol Ink - Gold Mixative
Gree Tara - Paper String - Black
Stix2Anything - Double-sided Tape

Thanks for stopping by
Jen
:-)

Sunday, July 15, 2012

The More Candles...

I made this card for Mum tonight (her Birthday is Monday) - her fav colour is blue so hard to resist using it :-)  The background for the front was made by spritzing water onto distress ink that was inked on my mat, and dragging the cardstock through it. The envelope was stamped 3 times with the Happy Birthday stamp in the hybrid ink.

 And the usual close-up :-) The roses were coloured by sponging the remaining ink/water onto them and then rubbing a touch of baby blue liquid pearls along the edges, then I rolled the wire.

The Chipboard was embossed with Snow Gum Opals, and the 'doily' was hand made by die-cutting a circle - then using my Martha Stewart bubble punch around the edges... Trial and error to line up and there was a bit of a messy overlap at the end but it's hidden by the flowers :-)

Ingredients:
Twiddleybitz - Small Frame (FRA016)
White Cardstock
Tim Holtz Distress Ink - Faded Jeans
Tim Holtz Distress Ink - Broken China
Tim Holtz Distress Ink - Salty Ocean
Hybrid Inks by Palette - Beaux Arts Blue
Stampin' Up - Stamp "the more candles..."
Hero Arts Stamp - "Happy Birthday" E1119
Martha Stewart Punch - Corner - Bubbles
MPress Nesting Dies - Circles (MP-1005)
Ranger Liquid Pearls - Baby Blue
Green Tara Roses - Blue 

Thanks for stopping by 
Jen :-)

Wednesday, July 11, 2012

She's Got "The Look"...


I love this photo of Erin - it's so me, and so my mum, and so her mum... that look over the glasses has been passed down through the generations!

I started out with perfect pearls, water, a minimister, dusty concord distress re-inker and the butterfly WOW Altamatz.  I love how this template changed my background!  I also sprayed my big flower with the purple spray and used my Martha Stewart corner bubbles punch to alter it - I love how effective this is and will be trying a few more on my flowers down the track!

Add some patterned paper from AED; some ribbon from Geen Tara; and some gorgeous Flourish With a Bling Purple Chloe Pearls; some more My2Angels flowers and a rose charm.  I also couldn't help using the gorgeous flowers from Manor House Creations. I couldn't go past using my beaded pin and the next dilemma I had was the journalling!

Too many times these days I see 'pretty' layouts that are just that - pretty, but they don't tell the story behind the photo.  I used to teach people that one of the main things with scrapping your photos was you no longer had to sit and explain every shot and your thoughts about it..but somewhere in the last 10 years, journalling seems to have been forgotten more often than not!  A great inspiration to me when it comes to journaling is my long-time friend Peg Hewitt.  Peg is an extremely talented scrapper who never omits the important stuff - journalling!  So inspired by Peg - I got my Dymo labeller out.  I used the paper to paper cartridge and printed out my journalling.  The only problem was - it was still white!! I decided it would be awesome if it was purple, but since I didn't have purple tape - I would have to make it purple!  I used Tim Holtz' sponging technique with distress ink and 'purples' my dymo journalling!  I had to wait a bit for it to dry before sticking down - but well worth the wait i think!

Thank you for stopping by and I hope you feel inspired to create, to journal, and to hopefully try some new techniques!!
Ingredients:
Cardstock - White Bazzil Linen
Patterned Paper - A Formal Affair Lounge Suit Music by Alison Ellis Design
Perfect Pearls - Grape Fizz
WOW Altamatz - Butterflies
Flourish With A Bling - Chloe Purple Pearl Flourish
Manor House Creations - Ballroon Waltz (Purple Lace Flower)
Manor House Creations - Country Lane - Purple
Martha Stewart Punches - corner bubbles
Crochet By Kim - Beaded Purple Bow Pin
Green Tara - Assorted Ribbons
Tim Holtz Distress Ink - Dusty Concord (my FAVOURITE colour)
Tim Holtz Distress Re-Inker - Dusty Concord
Dymo Labeller - Paper Tape cartridge, italic font, second largest font
Stix2Anything - Double-sided Tape

Thanks again
Jen :-)

Wednesday, February 29, 2012

Twisted Sketches Card #95

It's A Girl!

The latest Twisted Card Sketch is no 95 - and the twist is "Leap".  I thought what a great idea to do a birth card for a little baby girl!

Here's the sketch -
And here's my take on it :-)

and the customary close-up :-) You can see the gorgeous flowers Maria Featon made me for the Scrap Sanity flower swap!

Ingredients:
Cream Shimmer Cardstock
Prima Botanicals PP - Adore
Flowers by Maria Featon
My Favourite Things Open Scallop Doily
1 1/2 " hole punch
Tim Holtz Distress Ink - Aged Photo
My2Angels - Heart locket Charm
Papercraft Clear Cling stamps - Baby
Stampin Up Stamp n write Marker - close to cocoa
Green Tara brown flowers.

Thanks for stopping by!

Saturday, February 11, 2012

Lady of The Shrine

I have wanted to make a Twiddleybitz Birdcage for so long but everyone was "doing" them and I wanted mine to be a bit different (I also couldn't source a bird for inside!!).  I recently bought some weathered wood Tim Holtz Crackle and thought it was an awesome colour - then noticed I had some 'denim' coloured flowers and some other bits and pieces... and I couldn't stop - I ordered a custom-made flower flourish from the uber-talented Tracy at My2Angels and there was no holding me back!!

Here's my "Lady of The Shrine":

Here's a close-up of the inside of the cage:

Here's a close-up of the underneath of the stand and Tracy's gorgeous Flower Flourish:

Ingredients:
Twiddleybitz - Birdcage Small Pedestal (BCSM01)
Tim Holtz Distress Crackle Paint - Weathered Wood
Tim Holtz Distress Stickles - Rock Candy
Fourish With A Bling - White Pearl Grace Flourish
My2Angels - Flower Flourish Set, Made to Order - Denim
My2Angels - Smokey Blue (Denim) Roses
My2Angels - Mulberry Leaves - small
My2Angels - Black and Silver Love Key Chain
My2Angels - Resin Cabachon Oval Grey
My2Angels - White Hat Pin
My2Angels - Antique Silver Leaf Charms
Crochet By Kim - White 5 petal Flower
Green Tara Bow

Thanks for stopping by!!

Thursday, February 2, 2012

Lace Cupboard

I was asked early in the New Year to make another musical cupboard.  The brief was black and white, vintage, fashion...  I like how this one turned out.  The lady whom ordered it was very happy and I'm sure the recipient will be too if the lady's reaction is anything to go by!!


Outside - before adding the musical winder at the back:


With the doors open:


A close-up of Miss Mannequin:


I quite enjoyed this project.  I hand made the large flower inside by using similar techniques to those shown in this youtube video here for the Tim Holtz Grunge Roses.  The flowers were 5 x 3.5cm white mulberry flowers from the My2Angels White Mulberry Flower Paper Pack, then I added the leaves that I coloured with Distress Inks.


Ingredients:
Twiddleybitz - ATC Cupboard
Twiddleybitz - Vintage Miss Mannequins (VTG001)
Bo Bunny - Enchanted Patterned Paper
My2Angels - White Mulberry Flower Paper Pack
Tim Holtz Distress Crackle Paint - Picket Fence
Tim Holtz Distress Inks - Black Soot, Peeled Paint
Tim Holtz Distress Stickles - Clear Rock Candy
Stazon Ink - Black
Kaiser Pearl strips
Green Tara Lace
Miscellaneous Bead Chain


Thanks for stopping by!!

Sunday, January 29, 2012

CSI 3 - Just The Way I am.

When this Case File was revealed at CSI last friday I nearly died!!  I knew straight away which photo I wanted to use and what I wanted to do with it!!

I used a photo taken of me a couple of years ago when I actually wore make-up, first had a nose ring, and my hair had somewhat grown back after "Crop for a Cure", the colours were perfect.

Here's the close-up of all the fabulous bits and pieces from My2Angels that I used.  They were absolutely perfect for the colour scheme!  The new tile is gorgeous - cream, stamped in brown with a brass butterfly and jewelled centre attached.  And of course I used more Twiddleybitz and some Flourish With A Bling Pearls!

Ingredients:
Merci PP - Timeless Collection
Brown C/S
Doily
Tattered Angles Glimmer Mists - Pink Bubblegum & Coffee Shop
Crafty Notion Colorspray - Lilac Lustre
Twiddleybitz - Fern Scroll Corner (COR002)
Twiddleybitz - Flourish
Twiddleybitz - Butterfly
My2Angels - Brass Flower
My2Angels - Cabachon
My2Angels - Butterfly Tile
My2Angels - Brown Resin Roses
My2Angels - Pin
My2Angels - Heart Charm
My2Angels - Charming Chain - Purple
Manilla Tags
Flourish With a Bling - Latte Pearls
Tim Holtz Distress Stickles - Clear Rock Candy
Tim Holtz Distress Ink - Vintage Photo and Pink Bubblegum
Tim Holtz Distress Crackle - Tattered Rose
Stylish Images Australia Stamp - J2684
EK Success Tag Punch
Stampin Up Stamp n Write Markers - Pale Plum and Chocolate Chip
Green Tara - Brown Netting and Pink Pearl Trim

Thanks for stopping by.  xxx

Saturday, January 28, 2012

TCR #95 - Remember This Moment...

OMG  The Colour Room had me super inspired tonight the moment I looked at the palette AND the sketch.  Lucky for me I had the opportunity to sit down straight away and scrap!  Here's the gorgeous Palette and sketch -

And here's my layout:

And my customary close-up of course!

The colour palette appealed to the romantic in me and I printed the photo off straight away.  It was taken at my parents' Christmas in July Party 2011, hence the Merry Christmas Bell!  I think the Bo Bunny Enchanted Papers were perfect and a bit of a mist on a Tim Holtz mask alters the paper just that little bit to make it "mine".  I love the red pearl Flourish on the left side and all the flowers with the kindy glitz.  That day was a happy day for me amongst a lot of dark days with my depression so the title and quote was exactly perfect - Remember this moment.  There was nowhere else I wanted to be.

Ingredients:
Bo Bunny Enchanted Rose PP
Tattered Angels Glimmer Mist - Forest Green
Tattered Angels Glimmer Mist - Key Lime Pie
Crafty Notion Colorspray - Meadow
Crafty Notion Colorspray - Poppy
Twiddleybitz - Fence (BAS014)
Twiddleybitz - circle flower frame
Tim Holtz Mask - Flourish
Flourish With a Bling - Grace Pearl Flourish
My 2 Angels Mini Roses - Red
My 2 Angels - Pin
Scenic Route Rub-ons - Beautiful
Green Tara Bows
Kindy Glitz - Clear

Thanks for stopping by!!

Sunday, January 22, 2012

TCR #94 - XO

Well I have finally taken part in a "The Color Room" challenge.  I didn't use the sketch but I did feel quite inspired by the colour palette and had the perfect photo - here's my layout - the journalling reads:

"You're such an affectionate little boy, I hope you never grow out of showing it"

Here's the Challenge:


And a closeup to show the cluster, the shimmer from the coloursprays, and the Distress Stickles on the butterfly...


Because The Flourish was white and I needed yellow or off-white - I used the distress inks to colour the puffy jasmine - antique linen with a touch of mustard seed worked a treat!!


Ingredients:
Merci PP - Vintage Rose and Timeless collections
C/S - Miscellaneous grey
Twiddleybitz - Chippy Vine Hinge (HIN002)
Twiddleybitz - Chicken Mesh Wire (WIR002)
Twiddleybitz - Fern Leave (FER003)
Twiddleybitz - Oriental Borday (BOR021)
Twiddleybitz - Butterfly (BUT007)
Twiddleybitz - Large Letters X,O
Crafty Notions Colorsprays - gold
Flourish With A Bling - White Jasmine Puffy
Tim Holtz Distress Inks - Peeled Paint, Mustard Seed, Antique Linen
Tim Holtz Distress Stickles - Clear Rock Candy
Brilliance white ink
Papercraft clear cling stamp - from the "Love" set
Stampin Up stamp - LOVE
Stampin Up Stamp'n'write marker - Old Olive
Green Tara Flower sprays - Lemon
Cream brads (large)
Yellow Cotton


Thanks for stoppin' by!!!