Background

Showing posts with label Dienamics. Show all posts

Friday, June 7, 2013

Cherish... pop-up card

I love interactive cards!  I made my own pop-up card using the new Kaiser Papers - True Romance.  I used the 6" paper pad and the collectables.

It's so much easier to 'fussy cut' with the collectables instead of doing it by hand!!

A few slits here and there and hey presto - you have a pop-up card.

Ingredients:
Twiddleybitz white card and envelope, square
Kaiser - True Romance Paper Pad
Kaiser - True Romance Collectables
My Favourite Things - Dienamics, Open Scallop Doily

My Favourite Things - Dienamics, Open Scallop Border
Ranger/Tim Holts Distress Ink - Brushed Corduroy
Foam Tape

Thanks for stopping by!  If you've created a pop-up card recently, I'd love to see it - pop a link in the comments below and I'll come and visit!!  If you haven't - get cracking!

Jen
:-)

Saturday, May 18, 2013

Tip 4: Die-ing with Washi

I thought I was fairly limited in using washi.  
I couldn't punch it - it would stick to the punch unless I taped it to card first, then it negates the fact that it's adhesive tape; and it's not wide enough to use with my dies (and again with the whole being sticky thing!), or is it??

Tip 3: Washi Tape is PERFECT for Border Dies!!!!!
I have a number of border (and small dies) and recently tried putting them through my big shot with some washi - OMG I love this!!!  It's easy as the washi doesn't move when you are winding the plates through, and all the fiddley little bits and bobs are already adhesive backed so no glue-messes for me, and using Tip 2 I can keep these bits as well!!
This make me a happy little vegemite! :-)  I am so excited I just want to spend all day Die-ing my Washi!!

I just had to share my success and urge you to try your dies with your Washi Tapes as well so I took some photos for you to show you how I did it:

1.  I put a strip of matte white slightly longer than my border die on the base plate, then stuck my clock washi directly over the top (It's a bit see through and I wanted solid colour).  You can just tape your washi to you base plate if you like :-)

2.  Lay the die exactly where you want it and put the top plate on the stack for your machine.

3.  Rolled the stack through - be careful, your washi doesn't move but your die might - especially if your top plate is a little, warped (like me)!!

4.  Remove the surrounding and inner pieces from the diecut wash tape - but do not throw them away!! Store them on your Clear Acetate from Tip 2!!

5.  You now have a diecut strip of washi tape!! Use on a project straight away or pre-cut a few to store on some Clear Acetate to use in your projects later!!  No more waste or gluey mess with fine die cuts :-)

I really hope you're as excited as I am - I'd love to see your projects using your Die'd Washi so leave me a comment with a link - please!!!  I'll have an example of how I've used it in a full blogpost soon!!!

Thanks for stopping by!
Jen
:-)

Sunday, April 28, 2013

The Ant's Pants!

I have often stuck patterned paper to double sided Jac paper to turn it into a sticker and then put it through my Bigshot and onto my projects.  I didn't have to for this cute card!!

The ants are a new Sticky Paper from Sawyer's Place - I've reviewed the Sticky Paper previously Here.  It comes in A4 (there are 6 designs available so far), and as soon as I saw the ants I knew the card I had to create - I love this saying, and "you're the bees knees" as well!!

News Flash:
Sawyer's Place Sticky Paper is ON SALE at the moment for $4.00 for 2 sheets!!!!
Go and grab a bargain, and while you're there stock up on some Washi Tape too!!


The close-up shows how perfectly and smoothly 'finished' this paper is.

Ingredients:
Twiddleybitz 13cm square Card and Envelope - Black
White Cardstock
Sawyer's Place Sticky Paper  - Bianca Picnic Ants
Sawyer's Place Washi Tape - Pink (from the Bianca Floral 3pk)
Sawyer's Place Washi Tape - White
Die-namics - Perfect Bracket Edge
ManorHouse Creations Flower - Jubilee Princess Pink
Flourish With A Bling - Kate's Corner, Black
Stix2Anything - Adhesives
Smash Dymo Labeller

Thanks for stopping by today - don't forget to grab a bargain at Sawyer's Place, and come back soon (this afternoon) for another Tip/technique Post!
Jen
:-)

Sunday, September 30, 2012

Trick or Treat?

In Australia, Halloween is becoming more and more popular, not for it's origins - but more for the fact that it's a chance to have a fancy dress party and eat too many sweets!
When I was asked to create some Halloween items, I jumped at the chance and my immediate thought was some off the page treats...  what better inspiration than lollipops, adapted from the lovely Tracy at My2Angels! Please click THIS link to see her beautiful work.
Anyhoo - here's my take on Halloween Lollipops...... Doily-Pops!!!


 And individually for you:

1.


1.  The Spiderweb Halloween Doily-Pop:

  • The orange cardstock rosette is actually two taped together, I punched holes in them with an eyelet setter before assembling.

  • The metal doily/flower has been heat embossed with gorgeous Stampendous Aged Embossing Enamel - Black from My2Angels.

  • The Spider's eyes and bottom have been coloured using Pumpkin liquid pearls.

  • The double bow was made using my fingers like a "bow easy" tool.

  • The black swirls on the flower are a Jasmine Puffy flourish in black that has been cut in pieces to fit petals.

  • The Skewer is the lollipop stick and has been coloured with Black Stazon Ink.


Ingredients:

Kebab Skewer


Black Stazon Ink


Miscellaneous Spotted Ribbon


Flourish With A Bling Black Jasmine Puffy Flourish


Flourish With A Bling Black Pearls


Miscellaneous Orange flower


Spider Charm from My2Angels


Pumpkin Liquid Pearls from My2Angels


Metal Flower from My2Angels


Tim Holtz Rosette Die x2


Bazzil Linen - Festive


Tim Holtz Black Soot Distress Ink


Eyelet hole punch - normal size


Green Tara spider web ribbon


2.


2.  The Orange Doily Halloween Doily-Pop:

  • The Orange Doily has been coloured with Tim Holtz Spiced Marmalade Distress ink.

  • The Black Doily is a diecut from Die-Namics

  • The orange cardstock rosette is actually two taped together - inked on the edge with black soot distress ink.

  • The metal doily/flower has been heat embossed with gorgeous Stampendous Aged Embossing Enamel - Black from My2Angels.

  • I have added Black Pearls on the flower - 3 sizes, largest to smallest, outside to inside.

  • The Spider's eyes and bottom have been coloured using Pumpkin liquid pearls.

  • I kept the bow in place with wire and added the black tassel.

  • The Skewer is the lollipop stick and has been coloured by sponging Black Soot Distress Ink.


Ingredients:


Kebab Skewer


Miscellaneous Spotted Ribbon


Flourish With A Bling Black Pearls


Miscellaneous Orange flower


Spider Charm from My2Angels


Pumpkin Liquid Pearls from My2Angels


Metal Flower from My2Angels


Tim Holtz Rosette Die x2


Bazzil Linen - Festive


Tim Holtz Distress Ink - Black Soot


Dienamics Open Scallop Doily


Black Cardstock


Small white paper doily


Tim Holtz Distress ink - Spiced Maramalade


I hope you like my creations. These were SO much fun to make I have made some birthday and Christmas ones as well!!  Please leave me a comment or tag me on facebook if you decide to make some - I would love to see what you create :-)
Thanks for stopping by
Jen
:-)

Wednesday, February 29, 2012

Twisted Sketches Card #95

It's A Girl!

The latest Twisted Card Sketch is no 95 - and the twist is "Leap".  I thought what a great idea to do a birth card for a little baby girl!

Here's the sketch -
And here's my take on it :-)

and the customary close-up :-) You can see the gorgeous flowers Maria Featon made me for the Scrap Sanity flower swap!

Ingredients:
Cream Shimmer Cardstock
Prima Botanicals PP - Adore
Flowers by Maria Featon
My Favourite Things Open Scallop Doily
1 1/2 " hole punch
Tim Holtz Distress Ink - Aged Photo
My2Angels - Heart locket Charm
Papercraft Clear Cling stamps - Baby
Stampin Up Stamp n write Marker - close to cocoa
Green Tara brown flowers.

Thanks for stopping by!

Crazy For You and Scrap Sanity!

As you may already know, the lovely Tiff Sawyer asked me to be on her design team as her card specialist over at Scrap Sanity.  I am honoured and excited to be part of her fabulous team and vision for the future!

Every month I will be making at least two cards using products available at Scrap Sanity.  The first will be a simple folded card, portrait or landscape.  The second will be using the same or almost the same set of supplies to make a card that is not-so-normal.  I have a number of construction cards to get through by December and have started my first post with an Easel Card.

Please excuse the late night photography and dodgy blogpost while I should be packing as I move house Saturday!!

Here is the normal card -
A Simple Card using:
Basic Grey Kissing Booth PP
Red c/s
My Favourite Things - A Layered Label die
Some old rub ons i had laying around created the greeting
Flourish with a Bling pearls in antique gold
Tim Holtz Alterations Die - Tattered Floral (for the rose, instructions below)
             add for the construction card - Flourish with a Bling - Chloe Antique Gold

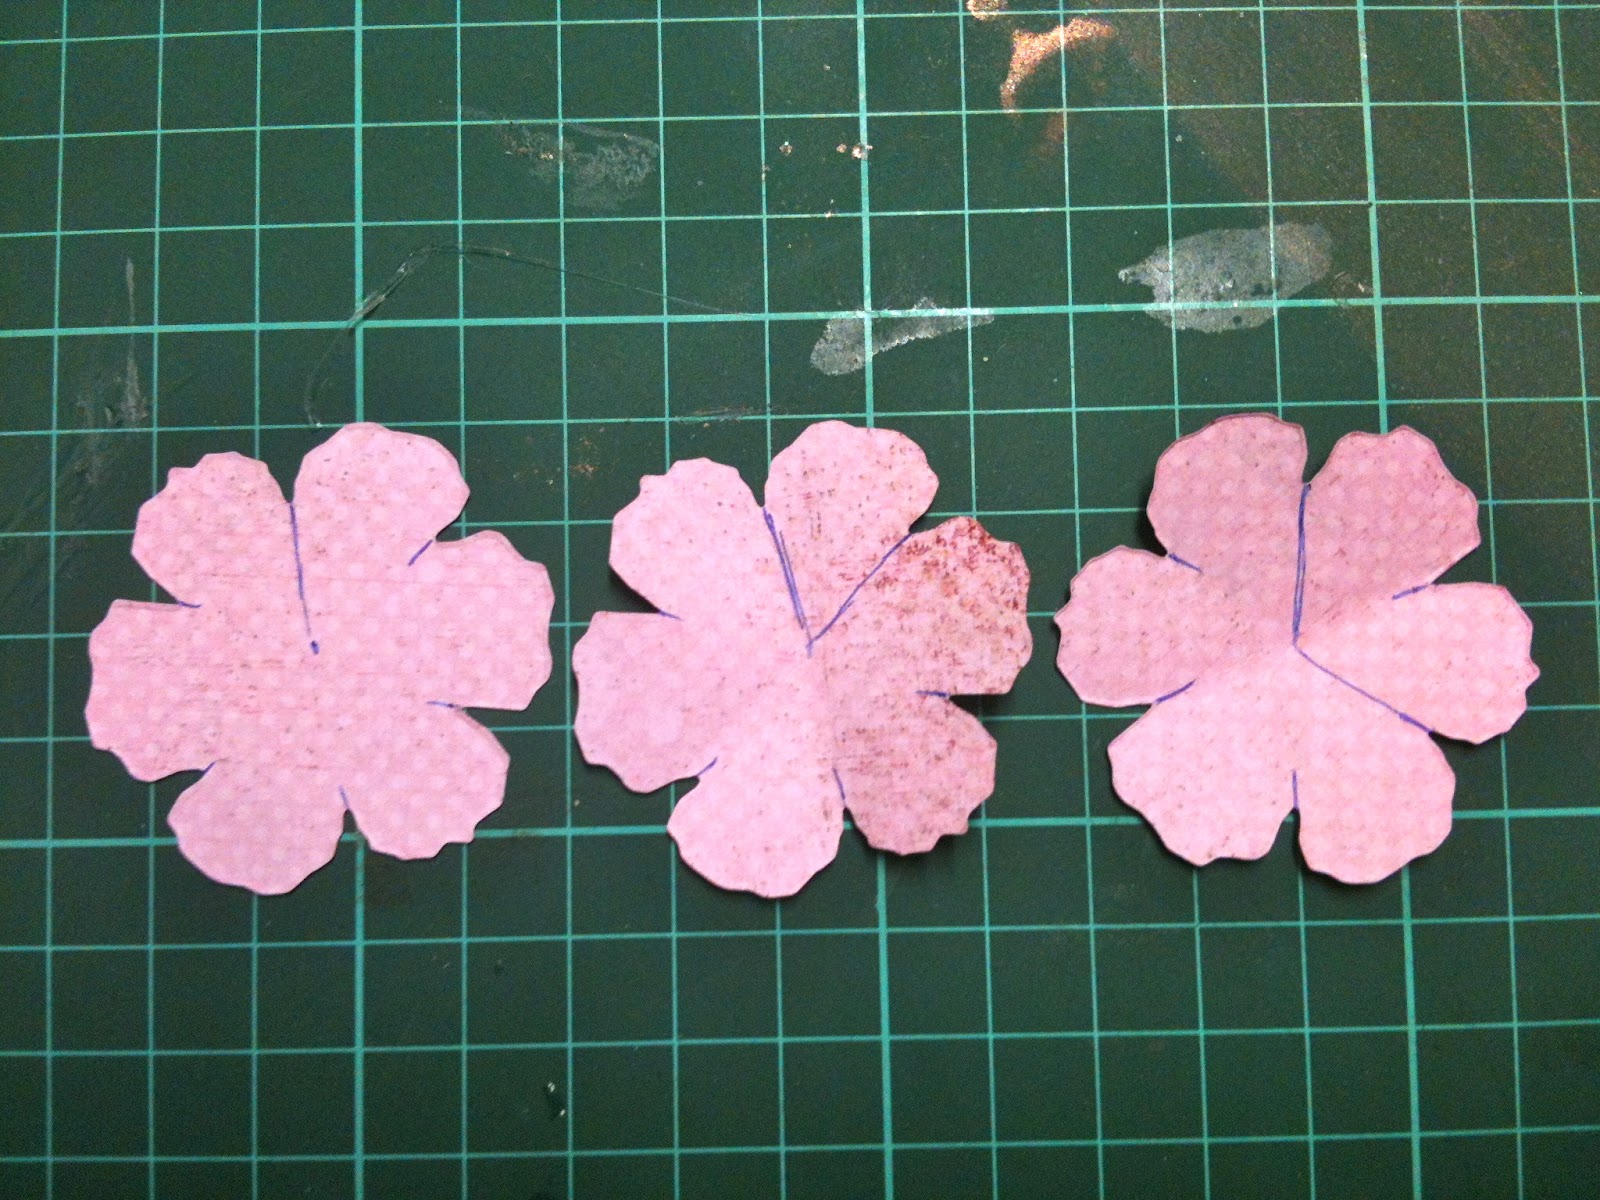
step 1 - cut 3 of the large 6 petal flowers..
 step 2 - cut a line to the centre, then one petal off, then 2 petals off...
 step 3 - roll the edges under with something narrow...
 step 4 - close the gaps by sticking one petal to another - see the X; but also roll and secure the 2petals and the 1 petal you removed...
 step 5 - they should look like this - just place then inside each other...
I added a Flourish with a Bling in the centre:

Now for the Easel card:
I cut a strip of c/s and folded at the points you see in the pic below
 Only put tape on the bottom half of the front of the card
 and decided it was too plain and needed some bling so lifted off the label and added some then put the label back down!
 Stick the rose to the inside of the card with some excess bling and that becomes the stopping object to keep the easel up!
And of course don't forget a matching envelope!!

Thanks for stopping by - and I hope you are inspired to create an easel card too!

Monday, January 16, 2012

Don't Count The Miles...

Twisted Sketches is a fabulous blog.  Anam and the team post a sketch and really beautiful examples every week, alternating between cards and layouts.  I am so happy to be counted on the card team!! This week was a 'week off' for me but I loved the idea of the sketch and it suited my desire to try my hand at a step-card using more of the My 2 Angels products I got in my DT kit for January.

Here's my take on the sketch and naturally I did an envelope to match :-)


Here's the sketch - The twist was sparkle... I used glittery cardstock :-P
I used some gorgeous products from My 2 Angels again...  they really do work brilliantly, even if I do say so myself!!  I especially love the big brass flower and the love pin!

Ingredients:
Precut and scored Card and envelope (I adjusted to make it a step-card)
Black and Cream Cardstock
Dienamics Stamp & Die Set - First Class Friend
Stazon ink - Black
Tim Holtz Distress Ink - Vintage Photo
Tim Holtz Distress Stickles
My 2 Angels - Love Pin
My 2 Angels - Metal Flower
My 2 Angels - Heart Charm
Flourish With A Bling - Antique Gold Pearls
Miscellaneous Ribbon

Anyhoo - that's it for another night, thanks for stopping by - I hope I have inspired you :-)

Thursday, December 29, 2011

All I want for Christmas...

I did this layout of the kids with Santa today.  A nice new clean studio is so inspirational!

I love these photos of the kids with Santa - Cameron looks so grown up and Erin is just stunning!  We did a couple of funny ones too - they're the smaller ones, Santa was a real sport!


Ingredients:
Tim Holtz Craft Core
Kaiser Paper
Twiddleybitz All I want for Christmas (WORXMAS02)
Twiddleybitz Christmas Presents 8 (XMAS012)
Twiddleybitz Christmas Flourish n Stars (XMAS033)
Flourish with a Bling Adhesive Pearls - Red
Flourish with a Bling Adhesive Pearls - Antique Gold
Flourish with a Bling Adhesive Rhinestones - Silver
Dienamics Tab Die
Assorted Mists
Assorted Stamps
Green Tara Bow

I used the core cardstock and embossed a Christmas tree in the corner and sanded over it.
I sprayed the baubles and presents - let them dry and then stamped them with stazon.

Thanks for stopping by!!
Jen

Thursday, November 3, 2011

My Scratch n Sniff Tutorial...

It's over at Twiddleybitz in the Tutorial Section now!!! Or go straight to it HERE!!

I am so excited about this tutorial - pardon the pun but it's been "on the cards" since the September Papercraft Festival in Brisbane!!  Just for you Nic and Louise, it's amazing what can come about when you laugh and muck around!!

here's a sneak peak...


Hope you enjoy it as much as I have!  Thanks for stopping by
Jen
:-)

Tuesday, November 1, 2011

A Wedding Card

For Rochelle's Sifu (My colleague's Kung Fu Instructor) whom is getting married soon.  In order for everyone at Kung Fu to sign it - it's a 12x 12 inch piece of cardstock folded in half :-)

I've used more Alison Ellis Design Papers from the Eastern Elements range; Dienamics dies - rosette and open scalloped doily; Twiddleybitz "Love", Heart, and Long Flourish - no tail; and a random stamp I found on my desk!!


I do hope you like it - thanks for stopping by!!

Jennifer

Sunday, October 30, 2011

Anther ATC Cupboard!!

Yep - I've made another one!!  This time for a young lady's 18th birthday.  
The brief was: Black, Red, Silver, "a bit gothy'.

I coloured the cupboard in black stazon - painted from the re-inker, it's SO much easier than painting everything!

I used the organza ribbon instead of the transparency on the front doors for something different and managed to bow each door and they sit nicely when the doors are closed...

Inside some Flourish with a Bling, a Tim Holtz rosette die and part of the MFT Die-namics dies with the ever gorgeous red roses from Green Tara...

And another wonderful Flourish in the back of the cupboard, topped off of course with some AED glitter!

a pin from My2Angels, add a rose, glitter and some feathers - makes the door a bit of an eye-catcher...

If you haven't tried these little cupboards - you simply must. Twiddleybitz have really thought of everything with regard to the design, they come with assembly instructions and photos too so it makes it even easier to use!  I have done a number of these now and have orders for two more!!

As part of the annual Christmas Blog Hop for Twiddleybitz this coming weekend (held in conjunction with the Australian Papercraft Festival in Sydney) I will have a SUPER project to show you, with a fantastic new technique - and some blog candy!!  All the action starts in the Twiddleybitz NING Friday - 4th of November 2011.

Thanks for stopping by - I hope you enjoyed this project, I look forward to seeing you again soon!

Saturday, October 15, 2011

Cards with Flourish

Another couple of projects for my Design Stint at Flourish With A Bling.

My favourite first - this card is for Cameron (turning 11) for his Birthday.  I used the Flourish as a mask on white cardstock using 3 different blue distress inks, then wiped the flourish clean and added it to the card - wrapped some string around it and added the ticket sentiment by MFT!

On to Christmas - a funny folded card with some embossing on a Twiddley tree and stamping, using the FWAB pearls as tree decorations among other things!


 Last but not least... 1 of a kind, I'm not sure I like this one yet - it still feels unfinished but I am hesitant about doing anything more to it because I have a bad habit of not knowing when to stop!!  I used the vine flourish which is beautiful and shiny - the most gorgeous green, and one of mum's 5 petal flowers in the variegated blue. I stamped the sentiment on a large brad with Stazon.

Hope you enjoyed this cards, I enjoyed making them!  Thanks for stopping by!

Friday, October 14, 2011

For Sheridan

This is the ATC cupboard I made for Vicki to give her BFF Sheridan for her birthday.  It was one of my projects for my Guest Design Team spot at Flourish With a Bling. I hope you like it - I had heaps of fun making it!  I have included the 'ingredients' list below.


Ingredients:
Twiddleybitz ATC cupboard and heart
Stazon white re-inker
Flourish With a Bling Clear Diamonte's
Green Tara Roses, jewelled flowers, silver bow
Alison Ellis Design Glitter - midnight
 Kaiser Transparency
White C/Stock
Birthday Stamp by Stamp It
Black Stazon ink
Black Soot Distress Ink
Spellbinders Die
Glossy Accents
PVA glue
Hot Glue Gun
Musical Wind-up

I will blog more info on the other items in my Flourish Guest Design Team Member Post tomorrow :-)
I also have some great news to share with you - there's a blog hop on the horizon..... and of course - prizes and competitions too!  So excited!

Thanks for visiting!

Monday, September 5, 2011

A Card for Mum...

I made this card for Mum as a sample card for her beautiful handmade crochet flowers. She has a little business selling them through a blog HERE. It's about to get a complete makeover - the products are going to be sold separately, postage will be charged at actual postage per order, she has new products to add too! Mum's crochet products are also going to be for sale at a craft fair next weekend (Sep 10/11th).
I have more samples I'll be posting all week and I cannot wait to show you the new products!!!!


I Used:
Crochet By Kim - Five petal flower - Bone
Alison Ellis Design Formal Affair Papers
My Favourite Things Dienamics - Layered label and open scallop border
Green Tara black bow with gold trim
Stamp - Sentiment by Kaisercraft

Technique notes:
* I attached the bow and the flower using Helmar sticky dots - not messy and adheres much better than tape or glue!
* I stuck double sided JAC paper to the back of the black cardstock before cutting the border die and this made it sooo much easier to adhere than trying to use glue or cut my tape in half lengthways!!

Thanks for visiting and don't forget to check mum's blog out and buy some gorgeous flowers!!

Sunday, September 4, 2011

My Favourite Things September Guest Designer

I came across this callout and just couldn't resist! I fell in love with the products when I was blog-hopping one day and came accross the ever so talented Francis Burne's blog. She has such a clean-cut style that is sooo me! I have been drooling over these gorgeous US-made stamps and dies for well over 6 months. I recently (finally) bought some at Paperific in Melbourne and when I saw the callout I thought fate had stepped in!

The challenge was to "Rip and Roll" - a couple of first for me even though I've been ripping and rolling for what must be half my life! I had NEVER made a rolled rose - BAM done! and I had NEVER used the MFT Dienamics Dies before. You can purchase them directly from MFT in the US or you can support the Aussie scrapping industry by purchasing here or at your local store - just ask them to stock them!

I used old papers that had been in my stash for about 6 years and the card has been given to my lovely friend Pam for her birthday. I love actually using what I create!!!


And here's the inside:

And I even managed one of my matching envelopes - although it is white and not Kraft (grrr Im all out!) it doesn't look too bad!