Background

Showing posts with label AED. Show all posts

Monday, July 1, 2013

Smash Cover

I bought a smash book over 4 months ago and have thought a number of times about actually using it.  I was a little uninspired as it's not my usual 'style'.  I like to get inky and dirty and layer etc, etc.  BUT the most wonderfully talented Cindy Porter (I'm so lucky she's my friend!) is on the Helmar Design Team and recently posted a tutorial using techniques I was a little familiar with, but with her own interpretations and an awesome result!!  All credit to Cindy for her amazing tutorial and inspiring me to finally do something!! Cindy's blog post is here.

Lucky for me I got to do this while Skype Scrapping with another gorgeous talented friend of mine - Fiona Butler, whom did the cover of her Smash Album at the same time!!

Here's a step by step on my Smash cover - using Cindy's technique as my base, and my little changes :-)


Before (with the plastic cover removed):

Remove the plastic and lay the book flat on your craft sheet.  Pour some Tacky Glue/PVA on the cover - nice and thick. Use a pallet knife to spread it around - and your finger to get ridges and texture...

Cindy used a candle to heat her tacky glue and get the 'soot' - I was too impatient so got out two (yes 2!) heat guns and heated my cover.  It bubbled and popped and shrank and did all sorts of interesting things!!

Then I added some Chipboard from Twiddleybitz, more glue, and heated again:

I then sprayed with a couple of green mists, and heated again:

Drying the mists as I went.  The darker areas are where the glue had shrunk and the mists soaked into the paper on the front cover.

When it was dry on the surface I added silver Inka Gold to bring out the lovely textures created by heating the glue.

And with the materials I used:

Ingredients:
Smash Journal
Helmar Tacky Glue
Claudine Hellmuth Multi Medium Gloss
Twiddleybitz Chipboard Title - "A Beautiful Life"
Twiddleybitz Chipboard - Long Flourish No Tail (FLOR022)
Viva Inka Gold - Silver
Lindy's Stamp Gang - Freaky Franken Lime
Crafty Notions Colorspray - Luscious Green
Pallet Knife and Heat Gun.

Thanks for stopping by - I hope you like my project - once again, thanks to the very talented and creative Cindy Porter!

Thursday, June 27, 2013

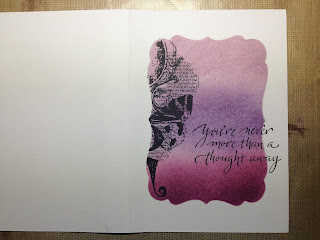
Never more than a thought away...


I revisited some old stamping techniques from years ago this week... Re-inspired by the new Tim Holtz Masking sheets to make your own Masks!

Taping the edges of the mask down with tape was unnecessary as the mask is sticky backed BUT as the mask did not have a large border, the washi tape protected the card a little like masking tape on walls when painting!

scrapbooking cardmaking


First colour of distress ink - Milled Lavender, sponged on top:
scrapbooking cardmaking


 Then the second  - Dusty Concord; and third - Seedless Preserve:
scrapbooking cardmaking

Black Archival Ink from Ranger on the Kaiser Stamp for a lovely crisp image:

scrapbooking cardmaking

And then again on a 'verse stamp' - removing the mask first and stamping outside the inked area creates another focal point:

scrapbooking cardmaking

Use a section of your mask to use the same inking effect to tie-in your envelope, BUT ink with the central colour first and then you can blend the colours either side into the middle and you will avoid the colour "halo" you can see through the top colour on the card.


And the finished card - inked around the edges with the three colours too!


ALSO - 
 I couldn't help visiting the Tuesday Ladies at My2Angels while on my lunch break, and couldn't resist getting all creative - with a lolly bag!!!
Thank you for stopping by - I hope you've enjoyed this post and the techniques used!!

Jennifer
:-)

Monday, June 17, 2013

Speedy Recovery

I'm not a big baker's twine fan but I will admit it was the perfect embellishment for this card using the Darkroom Door "Old Truck" Photo Stamp.
I stamped it a number of times on the shimmer card, first using vintage photo distress ink and then black stazon.  I shaded using brushed corduroy, vintage photo, and even black soot.  I used black stazon for the ink on the edges of the cardstock too giving each layer some nice definition :-)
The embossed panel under the photo has the impression defined by using the vintage photo ink as well.

I love this new stamp from Sparkle and Sprinkle too - I bought it through Alison Ellis Design while at Paperific.

Ingredients:
Twiddleybitz Shimmer Cardstock
Tsukineko Stazon Ink - black
Ranger/Tim Holtz Distress Ink - Corduroy, Vintage Photo, Black Soot
Darkroom Door - Old Truck photo stamp
Sparkle and Sprinkle Verse Stamp from Alison Ellis Design
My2Angels Baker's Twine - Brown and White

Thanks for stopping by!
Jen
:-)

Tuesday, May 14, 2013

Mum, with a bit of "Flair"!

I made this card for Mum for Mother's Day.  I used a new die I bought at Paperific last weekend and an alphabet die-set I bought a couple of years ago and have only used once!  I used the latest Wednesday Sketch from My Favourite Things for inspiration. MFTWSC123

I used some scraps of green patterned paper and some red and white cardstock on the pre-made cards and envelopes.  I used more scraps for cutting out the letters for "Mum".  To make it easier to stick them down as they're so thin, I stuck some double sided Jac Paper to the green card before I put it through the big shot, then it was simply peel and stick! For the flowers and Flair I used hot glue.
And for the inside of the card...
Ingredients:
Twiddleybitz - White C6 card and envelope
Sawyer's Place Washi Tape - Red polka dots, Cherries, White matt.
Sawyer's Place Flair - Cherries from Bianca Summer Collection
My2Angels - white flowers
Memory Box Co - Ringed Buckle Die 98186 (Red Flower)
Alphabet Dieset by - Provocraft
Stamp it - May this day 2437E
Alison Ellis Design - Double sided Jac paper
Stazon Ink - Olive Green
Adhesives - Stix2Anything
Hot Glue Gun
Miscellaneous red and white cardstock and patterned paper

TFL - Mwah! XXX
Jen

Thursday, May 2, 2013

Tip 3:Punching with Washi

I have discovered another way to get even more out of my Washi Tape - It is perfect for punching!
1.  Grab an edge punch - any brand will do so long as you can get a continual pattern or design.
2.  Adhere a strip of washi (long enough for your project)as close as you canto the edge of some removable backing (I used the backing from some sticky paper from Sawyer's Place) or transparency - but remember you're gonna punch holes in it so don't use your non-stick craft sheet!


3.  Punch your border all the way along the washi tape.


4.  Trim any little bits that didn't cut all the way through.  You will notice most, if not all, the 'confetti' will fall out.


5.  Peel from the backing and temporarily adhere to some transparency so you can experiment with placement on your project... (as seen in Tip 1)


6.  Adhere to your project and embellish.


See - easy peasy and so effective!!!


Ingredients:
Twiddleybitz - Kraft Card and Envelope
Cream Cardstock
Alison Ellis Design Patterned Paper
Sawyer's Place Washi Tape - gold
Edge/border punch
Flourish With A Bling - Flower from Elise pack
Alcohol Ink - Pebble (to colour the centre of the flowers)
Scenic Route Paper Co - Rub ons
Stazon Ink - Black
Adhesives by Stix2Anything
I would love to see your creations using Washi tape and border punches - please say hi and leave me a link to your creation in the comments below!
TFL - Mwah! XXX
Jen

Friday, April 26, 2013

Happy Birthday - Nikita

A certain young man has his very first girlfriend and it was her birthday yesterday.  I made this card for him to give to her today.  Blue is a favourite colour, so I went with White, Blue (Teal) and Silver as the colour scheme.

The close-up shows theTeal Cromwell Washi Tape fits beautifully centred on the Silver Washi Tape:
I also trimmed the top and bottom off some spare Teal Cromwell Washi Tape to get a lovely thin strip to edge the silver...

Ingredients:
Sawyer's Place Washi Tape - Cromwell in Teal!!
Sawyer's Place Washi Tape - Limited Edition Silver
White Cardstock
Alison Ellis Design - Silver Rose A4 Patterned Paper
ManorHouse Creations - Winters Song: Embers Flower
Stix2Anything Silicone Adhesive and Double Sided Tape
Miscellaneous Silver Envelope
Inside Greeting: Hero Arts Birthday Stamp - using Ranger/Tim Holtz Peacock Feather Distress Ink.

Thank you for stopping by - I hope you feel as inspired by this little card as I do!!
Jen
:-)

Friday, February 15, 2013

1st Valentine's Day

So for the first time - my son wanted to give a Valentine to a girl.  I made him a little card, then made one for my other two children to give if they wanted to... now to go make mine before my date tonight!!

 This for my eldest son's Valentine...
 And a close up of the gorgeous bling and floral flourish...
Ingredients:
Twiddleybitz - White 13cm square card and envelope
Bo Bunny Little Miss - Patterned Paper
White Doily
Ranger/Tim Holtz Distress Ink - Tattered Rose
Sawyer's Place Washi - Gold
Flourish With A Bling - Grace Pearl Flourish - Latte
My2Angels - Hand-made Floral arrangement - Pink
Kaiser Stamp - Valentine set
Adhesives by Stix2Anything
Stazon Ink - Brown

Miscellaneous Large Bow

And this next one for my Daughter - I think her Dad's getting this one...
 A close up of the flower cluster on the Twiddleybitz Chippy heart:
Ingredients:
Twiddleybitz - White 13cm square card and envelope
Adirondack Paint Dauber - Snow Cap
Alison Ellis Glitter - White Fizz
Kaiser Patterned Paper
Adhesives by Stix2Anything
Miscellaneous Flowers and Ribbon

This one for my 8 year old to give anonymously to a girl in his year level:
 I love this shot of the flower spray on an angle with the focus changing:
Ingredients:
Twiddleybitz Card - C6 Black
Miscellaneous Red envelope
Cardstock - white
White Doily
Kaiser Stamp - Valentine set
Ranger/Tim Holtz Distress Ink - Barn Door
Stazon Ink - Black
Sawyer's Place Washi - Bianca Floral Scroll
Sawyer's Place Washi - Black & White Scroll
Flourish With A Bling - Bella Rhinestone Flourish: silver
Adhesives by Stix2Anything
Miscellaneous Flower Sprays
Miscellaneous tape

Thanks so much for stopping by!
Jen
:-)

Friday, December 14, 2012

Dec 25th - Faux Washi


Hello Everyone, I'm here today with my first official post for Stix2Anything!

Being on a tight budget, versatility is a very important thing for me, so today I wanted to show you how versatile the Stix2 products can be!

I have stencil tape, it's a low tac tape designed to adhere, be removed, and re-adhere a number of times for using in stencilling (holding the stencil in place while using different medium for effect)
I'm sure you've seen the popularity explosion of Washi tape - well I have so many stamps - and over 80 ink pads that also I'm compulsive and purchase Washi tape - I also make my own using stencil tape!

First you design your card and decide on the colour and style you need.
Then you adhere a length of the stencil tape to your non-stick crafting sheet and colour with your ink and sponger - experiment with different types of ink and application techniques as water-based inks will have a different effect to alcohol based inks etc... and also taking into account the tape is cream in colour, not white - to begin with.

Then use a permanent ink to stamp your design on the tape - I've used stazon and made sure to stamp off my tape as well so that it's less rigid and 'ribbon-looking' if you know what I mean!
(and don't worry, the permanent ink does come straight off with a bit of stazon stamp cleaner :-))

so now we have made our washi tape we adhere it to our card/project (remember it may still be slightly transparent)

and here's a closeup -

To make the card I have used a pre-scored and folded card - inked the edges of the card and the patterned paper panels with the same colour ink I used for the tape.
I used Stix2 double sided tape to attach the paper panels to the front of the card.
I stamped my 'Dec 25' greeting in the stazon ink for longevity and again used the inks around the edges of the diecut.
This was then attached to the front of the card using the Stix2 adhesive foam tape.

This was a very simple card but the focal point is the eye-catching home-made faux washi tape :-)

I hope you like my first card and enjoy making your own washi tape!
Be sure to visit the Stix2Anything website to grab some stencil tape and get creating!
Jen
:-)

Ingredients:
Adhesives - Stix2Anything double sided tape, adhesive foam tape, stencil tape
Stix2Anything non-stick crafting sheet
Twiddleybits pre-scored and folded white card 13x13 cms
Patterned paper by Alison Ellis Design
Joy stamp by Sparkle n Sprinkle - available through Alison Ellis Design
Tsukineko Stazon innk - Olive Green
Ranger/Tim Holtz Distress Ink - Picket Fence
Kaiser Stamp Set CS727 - Dear Santa Collection
Mpress nesting scallop die

Friday, November 2, 2012

Star Banner - Riley

I recently created this banner for Riley - he is definitely star material!  Each part of the banner represents a different part of him or something he likes/enjoys.


To cover the chipboard stars with the white patterned paper I covered them in pva:
 I used my speedball to push out airpockets and excess glue.
 I then cut around them with my craft knife.
The I coloured them with Distress Stains and wiped off any excess with a tissue.
The silver embossed stars are resistant to the colour...
Then I filed the edges:
 Punched the hole with my eyelet punch:
I used my Distress Stain to colour my white ribbon and again the embossed stars resisted the colour - and then I hung them to dry overnight. I was afraid I'd get too excited trying to dry them with a heat gun and melt the ribbon!
Once I'd panted the car red I used black liquid pearls on the tyres, and orange and yellow for the flames:

Car Star Ingredients:
Twiddleybitz - Star Banner
Twiddleybitz - Small Car Minni Minor (TRA004)
Twiddleybitz - School Dayz Kids (SCH003)
Alison Ellis Design - Star Paper
Adirondack Paint Dabber - Citrus & Red pepper
Ranger/Tim Holtz Distress Stain - Mustard Seed
Ranger Liquid Pearls - Pumpkin, Daffodil, Onyx Pearls
Flourish With A Bling - Silver Rhinestones
Black Artliner 0.2
1" circle Punch
My2Angels - White Star Ribbon

"R" Star Ingredients:
Twiddleybitz - Star Banner
Twiddleybitz - R (TAB00R)
Twiddleybitz - Dog form Farm Yard Friends (ANI002)
Alison Ellis Design - Star Paper
Adirondack Paint Dabber - Snow Cap
Ranger/Tim Holtz Distress Stain - Faded Jeans
Ranger Liquid Pearls - Dark Chocolate, Daffodil, Onyx Pearls
Flourish With A Bling - Silver Rhinestones
Flourish With A Bling - Pearl, Blue
Flourish With A Bling - Luke Flourish, Blue
My2Angels - White Star Ribbon
Brown Cardstock

"I" Star Ingredients:
Twiddleybitz - Star Banner
Twiddleybitz - I (TAB00I)
Twiddleybitz - Cogs n Gears (TABCOG)
Alison Ellis Design - Star Paper
Ranger/Tim Holtz Distress Stain - Peeled Paint
Ranger Liquid Pearls - Daffoldil
Adirondack Paint Dabber - Snow Cap; Red Pepper & Peeled Paint
Flourish With A Bling - Jessie Flourish, Red
Flourish With A Bling - Pearl, Blue
My2Angels - Bike Charm
My2Angels - Ball Chain
My2Angels - White Star Ribbon

"L" Star Ingredients:
Twiddleybitz - Star Banner
Twiddleybitz - L (TAB00L)
Twiddleybitz - Dinosaurs Pk4 (DIN001)
Alison Ellis Design - Star Paper
Ranger/Tim Holtz Distress Stain - Mustard Seed; 
            Fired Brick; Vintage Photo; Peeled Paint
Ranger Liquid Pearls - Avocado
Adirondack Paint Dabber - Snow Cap
Flourish With A Bling - Pearl, Red
My2Angels - Stick Figure Charm
My2Angels - White Star Ribbon

"E" Star Ingredients:
Twiddleybitz - Star Banner
Twiddleybitz - E (TAB00E)
Twiddleybitz - School Dayz Kids (SCH003)
Alison Ellis Design - Star Paper
Ranger/Tim Holtz Distress Stain - Faded Jeans
Ranger Liquid Pearls - Daffodil, Ruby Red, Baby Blue
Adirondack Paint Dabber - Snow Cap
Flourish With A Bling - Luke Flourish, Black
My2Angels - Cap Charm
My2Angels - White Star Ribbon
Black Artliner 0.2

"Y" Star Ingredients:
Twiddleybitz - Star Banner
Twiddleybitz - Y (TAB00Y)
Twiddleybitz - Tab Stars (TABSTA)
Alison Ellis Design - Star Paper
Ranger/Tim Holtz Distress Stain - Peeled Paint; Faded Jeans
Ranger Liquid Pearls - Daffodil
Adirondack Paint Dabber - Snow Cap; Silver
Flourish With A Bling - Jessie Flourish, Red
My2Angels - Ball Chain
My2Angels - White Star Ribbon
Dymo Labeller

I coloured in the island chipboard with paint and distress stains.  I used liquid pearls to give dimension to the grass and the palm trees, and age and deterioration to the treasure chest, and adding the skull n crossbones charm to finish it off.  I used crackle paint for my sand to give texture: 

"Pirate" Star Ingredients:
Twiddleybitz - Star Banner
Alison Ellis Design - Star Paper
Ranger/Tim Holtz Distress Stain - Mustard Seed; Peeled Paint; Vintage Photo
Ranger/Tim Hotlz Distress Crackle - Scrattered Straw
Ranger Liquid Pearls - Avocado; Dark Chocolate; Onyx Pearl
Adirondack Paint Dabber - Gold
My2Angels - Skull n Crossbones Charm
My2Angels - White Star Ribbon

Figuring out how to hang all the stars on the ribbon was probably the hardest part as I wanted them to all be attached differently!  The key to getting it right is working out the spacing, pinning to hold the spot and allowing for movement when hung - and thinking about if it will be hung tightly or loosely...

Congratulations if you are reading as you managed to get all the way through - well done!!  I'd love to see your banner so be sure to go to the Twiddleybitz Ning and upload yours to the gallery so I can see it too!!

Thanks for joining me :-)
Jen