Background

Showing posts with label Stix2Anything. Show all posts

Saturday, May 18, 2013

Pink Hanger OTP and 18% discount!

I had a lot of fun creating this Project.  I have just found this draft with the images but no details.  There is a lot of product here but I can tell you most is available from My2Angels.

The best news is that until midnight Sunday (that's tomorrow night!) you can get 18% discount by noting "BIRTHDAY" as the code through the checkout!!!   Spoil yourself, get a bargain, and don't forget to check out Tracy's handmade charming chains, dates, and embellishments!!


Tuesday, May 14, 2013

Mum, with a bit of "Flair"!

I made this card for Mum for Mother's Day.  I used a new die I bought at Paperific last weekend and an alphabet die-set I bought a couple of years ago and have only used once!  I used the latest Wednesday Sketch from My Favourite Things for inspiration. MFTWSC123

I used some scraps of green patterned paper and some red and white cardstock on the pre-made cards and envelopes.  I used more scraps for cutting out the letters for "Mum".  To make it easier to stick them down as they're so thin, I stuck some double sided Jac Paper to the green card before I put it through the big shot, then it was simply peel and stick! For the flowers and Flair I used hot glue.
And for the inside of the card...
Ingredients:
Twiddleybitz - White C6 card and envelope
Sawyer's Place Washi Tape - Red polka dots, Cherries, White matt.
Sawyer's Place Flair - Cherries from Bianca Summer Collection
My2Angels - white flowers
Memory Box Co - Ringed Buckle Die 98186 (Red Flower)
Alphabet Dieset by - Provocraft
Stamp it - May this day 2437E
Alison Ellis Design - Double sided Jac paper
Stazon Ink - Olive Green
Adhesives - Stix2Anything
Hot Glue Gun
Miscellaneous red and white cardstock and patterned paper

TFL - Mwah! XXX
Jen

Wednesday, May 8, 2013

Riley's Ransom

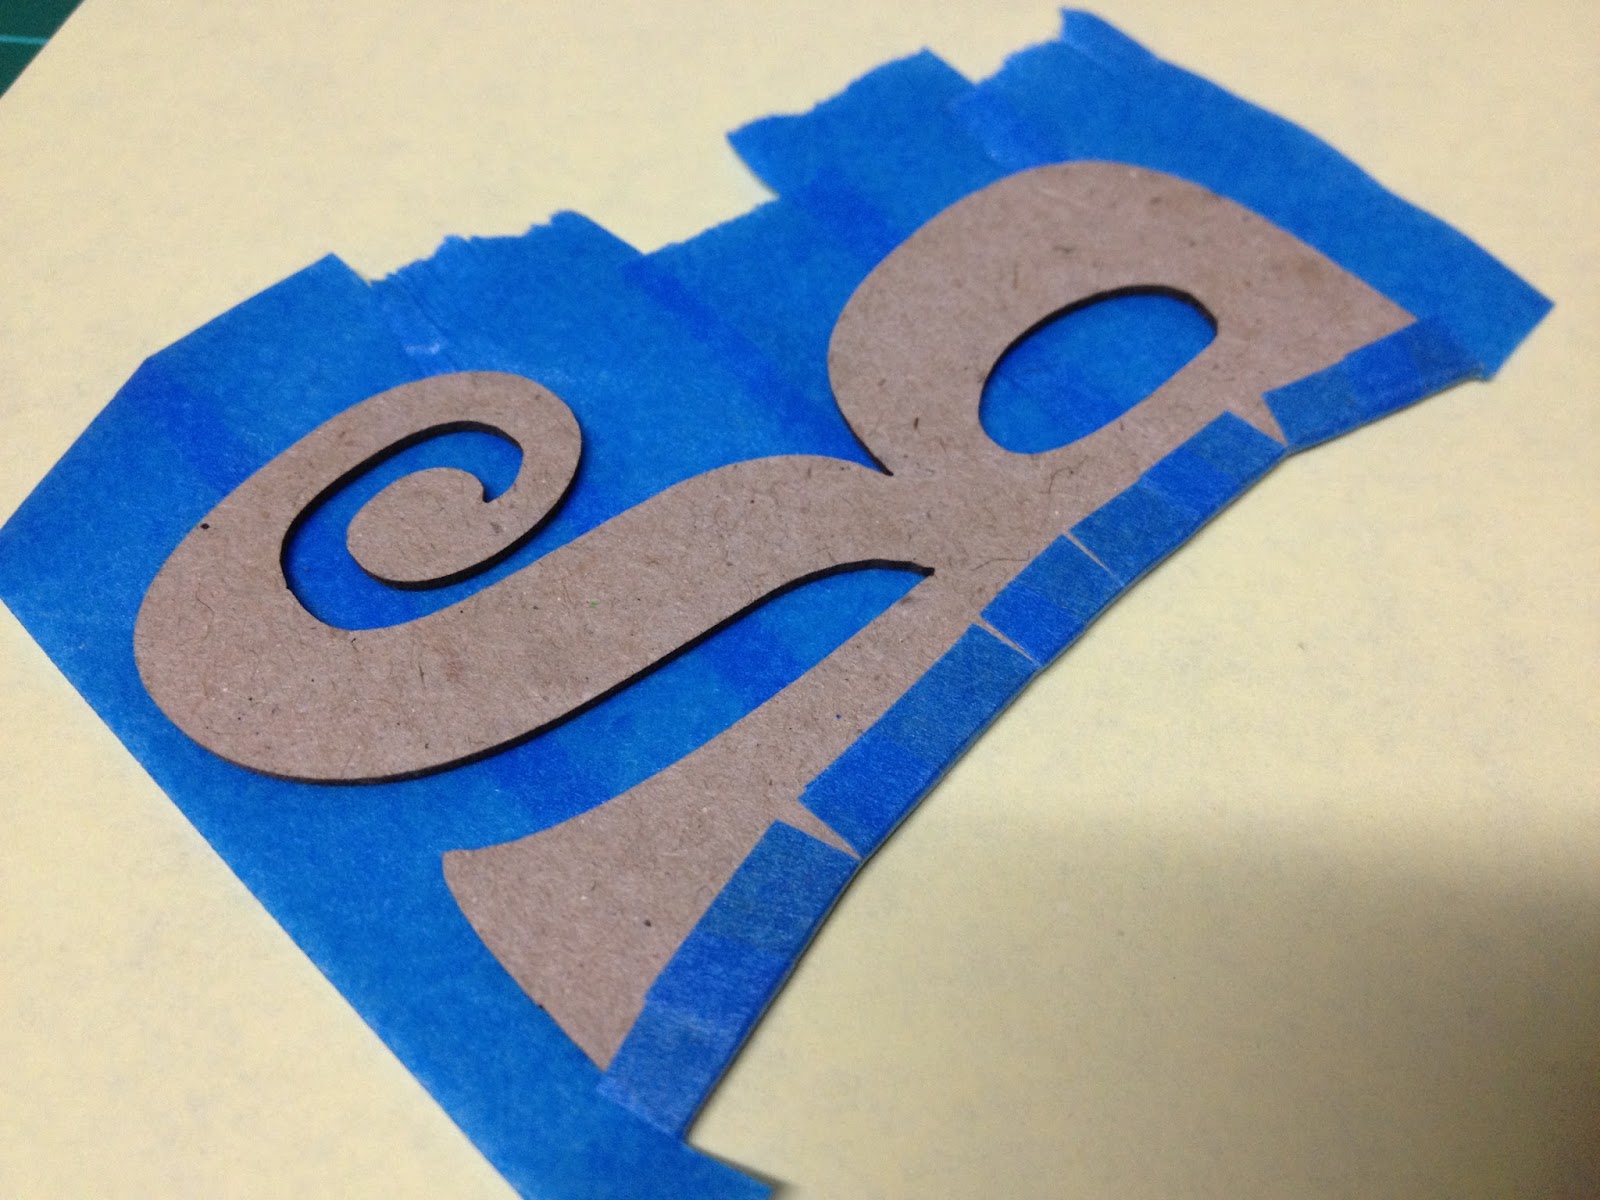
Another thing I love to do is use Chipboard on my projects!  I ink, paint, cover with paper, leave naked, emboss, dry emboss, you name it - I've done it!!  I am happy to report that covering chipboard with Washi Tape can be added to that list!!!  It's super easy and quite effective - another way to get perfect co-ordination :-)

I placed the chipboard down - right side up on non-stick backing (you can use your non-stick craft sheet).

Please the chipboard up and snip the washi tape overhang at short intervals. Than fold and stick to the chipboard.

For Letter ''holes it's best to make a multiple armed star incision and then fold each 'triangle sliver' over and stick to the chipboard, you get better coverage, adhesion, and less bumps!

I used the fabulous Ransom Sticky Paper for the background on this card, teamed with the Cromwell Washi Tape:

You can also see in the closeup I cut the letters for Riley's name from the Ransom Sticky Paper too!
Ingredients:
Twiddleybitz Card and Envelope
Twiddleybitz Large Letter - R
Sawyer's Place - Sticky Paper "Ransom"
Sawyer's Place - Washi Tape: White, Red, Blue, Cromwell black
Adhesives by Stix2Anything

TFL - Mwah! XXX
Jen

Thursday, May 2, 2013

Tip 3:Punching with Washi

I have discovered another way to get even more out of my Washi Tape - It is perfect for punching!
1.  Grab an edge punch - any brand will do so long as you can get a continual pattern or design.
2.  Adhere a strip of washi (long enough for your project)as close as you canto the edge of some removable backing (I used the backing from some sticky paper from Sawyer's Place) or transparency - but remember you're gonna punch holes in it so don't use your non-stick craft sheet!


3.  Punch your border all the way along the washi tape.


4.  Trim any little bits that didn't cut all the way through.  You will notice most, if not all, the 'confetti' will fall out.


5.  Peel from the backing and temporarily adhere to some transparency so you can experiment with placement on your project... (as seen in Tip 1)


6.  Adhere to your project and embellish.


See - easy peasy and so effective!!!


Ingredients:
Twiddleybitz - Kraft Card and Envelope
Cream Cardstock
Alison Ellis Design Patterned Paper
Sawyer's Place Washi Tape - gold
Edge/border punch
Flourish With A Bling - Flower from Elise pack
Alcohol Ink - Pebble (to colour the centre of the flowers)
Scenic Route Paper Co - Rub ons
Stazon Ink - Black
Adhesives by Stix2Anything
I would love to see your creations using Washi tape and border punches - please say hi and leave me a link to your creation in the comments below!
TFL - Mwah! XXX
Jen

Friday, April 26, 2013

Happy Birthday - Nikita

A certain young man has his very first girlfriend and it was her birthday yesterday.  I made this card for him to give to her today.  Blue is a favourite colour, so I went with White, Blue (Teal) and Silver as the colour scheme.

The close-up shows theTeal Cromwell Washi Tape fits beautifully centred on the Silver Washi Tape:
I also trimmed the top and bottom off some spare Teal Cromwell Washi Tape to get a lovely thin strip to edge the silver...

Ingredients:
Sawyer's Place Washi Tape - Cromwell in Teal!!
Sawyer's Place Washi Tape - Limited Edition Silver
White Cardstock
Alison Ellis Design - Silver Rose A4 Patterned Paper
ManorHouse Creations - Winters Song: Embers Flower
Stix2Anything Silicone Adhesive and Double Sided Tape
Miscellaneous Silver Envelope
Inside Greeting: Hero Arts Birthday Stamp - using Ranger/Tim Holtz Peacock Feather Distress Ink.

Thank you for stopping by - I hope you feel as inspired by this little card as I do!!
Jen
:-)

Tip 2: Storing your Washi off-cuts

As you explore the many ways of using your washi tapes - you may just discard your off cuts; the half-widths, the excess from a cut pattern, the words from the cromwell tape you didn't need... but I prefer to keep them just in case I can use them up.  The problem with that, is the many lengths of tape hanging from the edge of my crafting table, sticking to my clothes whenever I lean too close!!  

My solution is simple - Here's my "Before" photo:


Tip 2: Storing your Washi off-cuts
Save your off cuts to be used again by sticking them to clear acetate sheets.  I've punched some binder holes in mine to store it in an A4 folder that also have some of my nesting dies in (arranged on magnetic A4 sheets - AWESOME!)
The washi is easy to see, I can group by colour/size/style/whatever, and I can see at a glance that I don't need to cut the next 20cm from my Cromwell Washi Tape to get the word I'm after - as it's on this sheet!!

Here's my "After" photo:


Let me know how this tip works for you!
Thanks for stopping by
Jen
:-)

Washi Techniques - Slice n Dice a Background!

Have you realised that you can cut your washi tape lengthways?  I had a "derrrr" moment not so long ago when I realised I could not only cut or tear my washi tape off at different lengths - but cut it so I had different widths!!!

I am hopeless at making decisions regarding co-ordinating products for my projects; so I love that the Sawyer's Place Washi Tapes are not only sold in single rolls, but in co-ordinating packs - grouped together so I don't have to think!!

The following cards were made using wash tapes from the packs available at Sawyer's Place:


To make these Washi Backgrounds:
Place strips of washi on your cutting mat.  Using a ruler and craft knife - slice until you have the desired thickness/s - use the grid lines on the craft mat to keep the edges straight!

When laying your washi on your background - pick an angle and use the grid lines on the craft mat to keep everything uniform - Or not if that's how you want it!  Do break up the 'tyre tread' pattern I used the 'caution' co-ordinating washi from the  pack.

Peel your panel from the craft mat and tuck your edges over.  Attach to the front of your card and attach your embellishments - I LOVE this flair "look out"!  It was perfect for the theme of this card; celebrating success for passing a learner's driving test!

Here's the customary close-up :-)

Ingredients:
"Learner"
Sawyer's Place Washi Tapes - Sampson Collection
Sawyer's Place Rourke's Rounds, Flair - Sampson Collection
Stix2Anything Silicone Adhesive (I prefer this to foam tape for adding dimension)
Twiddleybitz C6 Card and Envelope - Black
Twiddleybitz Square Alphabet Letter - "L"
White Cardstock
Ranger/Tim Holtz Distress Ink - Squeezed Lemonade
Stazon Ink - Black
Miscellaneous Black Ribbon


"Wishing You A Happy Day"
Sawyer's Place Washi Tape -Titus Collection (Steel Blue Robots)
Sawyer's Place Rourke's Rounds, Flair - Titus Collection
Stix2Anything Silicone Adhesive (I prefer this to foam tape for adding dimension)
Twiddleybitz C6 Card and Envelope - White
Stazon Ink - Black; Midnight Blue
Washi Tape - blue from ???
My Favourite Things - Die-namics name plate

I hope I've inspired you to get even more from your washi tape!  I'd love to see a comment with a link if you've been using yours!  Please stay tuned for more Washi ideas and tips and tricks :-)

Thanks for stopping by
Jen
:-)

Wednesday, April 24, 2013

Tip 1: Washi Tape Positioning and your Projects...

I love creating, and like so many people I agonise over the arrangement of my papers, card stock, photos, and embellishments on my layouts, cards, and other projects.  I have a few little tips and tricks up my sleeve for using different elements and techniques in my crafting and thought I might start sharing a few with you!!

Tip 1:  Using Washi Tape
This tip works especially well for lettered or patterned washi tape, although you could use it for any type.
A fantastic way to determine the arrangement of words from the Sawyer's Place Cromwell Tape is to stick it to clear plastic;  you can then move it around on your project.  You can also re-position the words on the plastic in different patterns, and then try it around your project again.  When you are happy you can stick the words onto your project once - avoiding any problems trying to peel it back off again to re-position!
(although Sawyer’s place Washi Tapes are “low-tac” so rarely rip your paper or cardstock anyway!)

I used this tip on the following layout - as you can see from the photos:


Finally satisfied with the placement of my tape I finished my layout - with no tears!!

I hope this tip is useful for you - stay tuned for tonight's technique tutorial on wash tape - something so simple but you may have never thought to do!
Jen
:-)

Monday, April 22, 2013

Cromwell Tape - Love is Awesome

I thought black Cromwell Tape was a rather exciting addition to the washi tapes at Sawyer's Place, but the addition of Teal Cromwell tape is even more awesome!!

I made this lovely card tonight - it was rather easy :-)  Three words sliced from the tape for the greeting - combined with some Bo Bunny Flower Child papers and a Flourish from Flourish With A Bling.  

I wanted to add the matte red washi to the card - but as it's slightly transparent, I used two strips of white matte washi tape under the matte red tape (only one white shown in photo - I added another after the photo as I wasn't happy :-).

 Then I added the Puffy Jasmine Flourish and trimmed the ends from the washi tape:

 I used Stix2Anything Silicone Adhesive to create dimension as an alternative to foam tape.  Just remember to let it dry for a few moments before attaching the greeting block to the card front and don't push down too hard!

 I stuck the Teal Cromwell tape on the Bo Bunny Flower Child Cut out for the greeting block...

 And wallah!  A quick and simple card all finished!! 

Ingredients:
Bo Bunny 12" Flower Child Patterned Paper - Groovy and Cut-outs
Sawyer's Place Washi Paper - White Matte
Sawyer's Place Washi Paper - Red Matte
Sawyer's Place Washi Paper - Teal Cromwell
Flourish With A Bling - Jasmine Puffy Flourish - Teal
Stix2Anything - Silicone Adhesive

Thanks for stopping by!!
Jen
:-)

Friday, April 5, 2013

Our Newest Family Addition

My first layout of this gorgeous sweetheart...
Isabella Jayde Canfield.  My Cousin Lee Lee's first child.  We seem to have a connection - I am so blessed to have three beautiful children of my own and be able to be part of Isabella's life. :-)

I used a lot of products that have been in my stash for quite some time.  I have no idea who the manufacturers of the doily, paper, or rub-on are.  Of course I added ink... Stazon Black :-)  All adhesives used were by Stix 2 Anything.  I needed to make sure the items are going to adhere and not come off - I am confident Stix2 will do the job :-)


Flourish With A Bling Adhesive Pearls, Twiddleybitz Chipboard Butterflies:

Prima Flowers and Iridescent Pain, Twiddleybitz Chipboard Passionfruit flower:


Twiddleybitz Chipboard Oriental Border:


Thanks for stopping by
Jen
:-)

Wednesday, March 13, 2013

Beautiful Sugar Beads Card


This card was quite a simple one to put together.  I grabbed my stamp set with the dress and matching quote, some ink, card stock, glue and sugar beads!!

  • I used a black pre cut and scored card from Twiddleybitz, and used purple card stock with a white matt for my front.  
  • I stamped the dress onto some white card stock, and the verse onto the small white doily.
  • I attached the doily to the card stock and before attaching the stamped panel, I inked the edges.
  • I then added a layer of Glossy Accents to the dress and poured my sugar beads on!!  I left this for half an hour while I had a culpa tea and came back and tapped of the excess beads
  • I then added a bunch of rose buds and a white and silver prettied bow using a little hot glue

Ingredients:
Cardstock - white and purple
My2Angels - Sugar beads - Purple Passion
My2Angels - White Rose buds
My2Angels - White and silver bow
Glossy Accents bought from My2Angels
Stix2 Anything Double sided tape
Black Stazon Ink
Miscellaneous stamps
Hot glue gun

Thanks for stopping by!
Jen
:-)

Sunday, February 24, 2013

Sugar Beads

One of the fabulous new additions to the product range at My2Angels is Sugar Beads!  These mixtures of beads are available in great colour combinations and I couldn't resist the mint crush, and of course Purple Passion.  Despite my mojo drought, ideas were popping in my head all the time and I just had to find the time to put some of them to use.

I have seen the beads used to cover chipboard and I wanted to use both the colours of the sugar beads on the one project, so I originally thought purple flowers and green stems or grass.... that developed into a white butterfly with purple wings and a bunch of flowers and the stems of the bunch hmmm...

After painting the butterfly white, letting it dry and attaching it to my card, I filled the wings one at a time with hot glue (from my glue gun) and poured the beads all over it - pressing them in, tapping off the excess and putting them back in the little pot.  I repeated this for all three wings.

The bunch of purple flowers, I added the three rose buds to and wrapped the stems around each other.  I then laid hot glue along the stems and again poured and pressed the beads into it, tapping off the excess.  I use a little more hot glue to attach the bunch to the card - and the bow to the bunch.

I slid the love charm under the edge of the bunch and added some 'movement' to the butterfly with a piece of FWAB chloe purple pearl flourish.

Ingredients:
Twiddleybitz - White C6 card
Twiddleybitz - Butterflies Assorted (BUT003)
Black Cardstock
Kaiser Patterned Paper - Konstrukt Collection
My2Angels - Purple Orchids
My2Angels - Purple Rose Buds
My2Angels - Mauve and Silver Love Charming Word
My2Angels - Sugar Beads - Mint Crush
My2Angels - Sugar Beads - Purple Passion
Flourish With A Bling - Chloe Pearl Flourish - Purple
Ranger - Liquid Pearls - Orchid
Adirondack - Acrylic Paint Dabber - Snowcap
White Paper Doily

Thanks for stopping by and don't forget to visit My2Angels and grab some Sugar Beads!

Jen
:-)

Friday, February 15, 2013

1st Valentine's Day

So for the first time - my son wanted to give a Valentine to a girl.  I made him a little card, then made one for my other two children to give if they wanted to... now to go make mine before my date tonight!!

 This for my eldest son's Valentine...
 And a close up of the gorgeous bling and floral flourish...
Ingredients:
Twiddleybitz - White 13cm square card and envelope
Bo Bunny Little Miss - Patterned Paper
White Doily
Ranger/Tim Holtz Distress Ink - Tattered Rose
Sawyer's Place Washi - Gold
Flourish With A Bling - Grace Pearl Flourish - Latte
My2Angels - Hand-made Floral arrangement - Pink
Kaiser Stamp - Valentine set
Adhesives by Stix2Anything
Stazon Ink - Brown

Miscellaneous Large Bow

And this next one for my Daughter - I think her Dad's getting this one...
 A close up of the flower cluster on the Twiddleybitz Chippy heart:
Ingredients:
Twiddleybitz - White 13cm square card and envelope
Adirondack Paint Dauber - Snow Cap
Alison Ellis Glitter - White Fizz
Kaiser Patterned Paper
Adhesives by Stix2Anything
Miscellaneous Flowers and Ribbon

This one for my 8 year old to give anonymously to a girl in his year level:
 I love this shot of the flower spray on an angle with the focus changing:
Ingredients:
Twiddleybitz Card - C6 Black
Miscellaneous Red envelope
Cardstock - white
White Doily
Kaiser Stamp - Valentine set
Ranger/Tim Holtz Distress Ink - Barn Door
Stazon Ink - Black
Sawyer's Place Washi - Bianca Floral Scroll
Sawyer's Place Washi - Black & White Scroll
Flourish With A Bling - Bella Rhinestone Flourish: silver
Adhesives by Stix2Anything
Miscellaneous Flower Sprays
Miscellaneous tape

Thanks so much for stopping by!
Jen
:-)