Background

Thursday, June 27, 2013

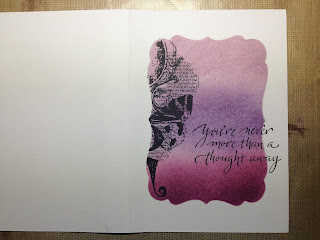
Never more than a thought away...


I revisited some old stamping techniques from years ago this week... Re-inspired by the new Tim Holtz Masking sheets to make your own Masks!

Taping the edges of the mask down with tape was unnecessary as the mask is sticky backed BUT as the mask did not have a large border, the washi tape protected the card a little like masking tape on walls when painting!

scrapbooking cardmaking


First colour of distress ink - Milled Lavender, sponged on top:
scrapbooking cardmaking


 Then the second  - Dusty Concord; and third - Seedless Preserve:
scrapbooking cardmaking

Black Archival Ink from Ranger on the Kaiser Stamp for a lovely crisp image:

scrapbooking cardmaking

And then again on a 'verse stamp' - removing the mask first and stamping outside the inked area creates another focal point:

scrapbooking cardmaking

Use a section of your mask to use the same inking effect to tie-in your envelope, BUT ink with the central colour first and then you can blend the colours either side into the middle and you will avoid the colour "halo" you can see through the top colour on the card.


And the finished card - inked around the edges with the three colours too!


ALSO - 
 I couldn't help visiting the Tuesday Ladies at My2Angels while on my lunch break, and couldn't resist getting all creative - with a lolly bag!!!
Thank you for stopping by - I hope you've enjoyed this post and the techniques used!!

Jennifer
:-)

Tuesday, June 25, 2013

Me & You

I LOVE this layout of Erin and I, it's in our favourite colours too.

I started with a piece of embossed white card stock and sponged Distress Inks on to give definition.  I also used the ink and water to colour the tag.  I coloured the chipboard pieces (title, frame, and butterfly) with Liquid Pearls - applied by dabbing my finger onto the chipboard one colour at a time.  I coloured washi tape first with alcohol inks, then liquid pearls and ran it through my big shot with a die to get the cute shape, then just peeled it off and stuck it to my project.

I coloured the leaves with alcohol inks, and the edges of the flowers with liquid pearls and distress inks.
I added Flourish With A Bling pearls to the butterfly and as a movement indicator with the flourish, the pin, daughter charm, and the date was printed on clear dymo tape.

Ingredients:
Embossed Cardstock
Twiddleybitz Chipboard - "Me & You"
Twiddleybitz Chipboard - Ornate Frame
Twiddleybitz Chipboard - Butterfly
Manilla Tag
Ranger/Tim Holtz Distress Ink - Seedless Preserve
Ranger/Tim Holtz Distress Ink - Salty Ocean
Ranger/Tim Holtz Distress Ink - Peacock Feathers
Ranger Alcohol Ink - Wild Plum
Ranger Alcohol Ink - Sail Boat Blue
Ranger Alcohol Ink - Clover
Ranger/Tim Holtz Distress Stain - Picket Fence.
Ranger Liquid Pearls - Orchid
Ranger Liquid Pearls - Lavender Lace
Ranger Liquid Pearls - Baby Blue
Ranger Liquid Pearls - Peacock
Ranger Liquid Pearls - Mint Green
My2Angels - leaves
My2Angels - Roses
My2Angels - Charming Pin
My2Angels - Charming "Daughter"
Flourish With A Bling - Silver Diamonte
Flourish With A Bling - Chloe Flourish, Baby Blue
Sawyer's Place Washi Tape - Pale Blue
MPress Rolled Flower Die
Tsukineko Stazon Permanent Ink - Black
Miscellaneous Flower Stamp
Miscellaneous Music Stamp

I hope you like the techniques I've used today and try them for yourself!  Thanks for stopping by!
Jen
:-)

Thursday, June 20, 2013

Tip 4: Die-ing with Washi (Follow-up)

A quick followup on Tip 4 and a sneak peak of a finished project using this technique!

I coloured some plain washi with alcohol inks, and put through the big shot - looks awesome, and you could use it straight away just like that! BUT

 If you want to then colour with something like liquid pearls - they will dry and have a surrounding 'skin' that will ruin the project unless you cut it away or put it through your bigshot again!

A much better idea is to colour it first as below:

After it dries, put it through the big shot using your die:

And add to your project :-)

For the full reveal - stay tuned for tomorrow night :-D

Thanks for stopping by!
Jen
:-)

Monday, June 17, 2013

Speedy Recovery

I'm not a big baker's twine fan but I will admit it was the perfect embellishment for this card using the Darkroom Door "Old Truck" Photo Stamp.
I stamped it a number of times on the shimmer card, first using vintage photo distress ink and then black stazon.  I shaded using brushed corduroy, vintage photo, and even black soot.  I used black stazon for the ink on the edges of the cardstock too giving each layer some nice definition :-)
The embossed panel under the photo has the impression defined by using the vintage photo ink as well.

I love this new stamp from Sparkle and Sprinkle too - I bought it through Alison Ellis Design while at Paperific.

Ingredients:
Twiddleybitz Shimmer Cardstock
Tsukineko Stazon Ink - black
Ranger/Tim Holtz Distress Ink - Corduroy, Vintage Photo, Black Soot
Darkroom Door - Old Truck photo stamp
Sparkle and Sprinkle Verse Stamp from Alison Ellis Design
My2Angels Baker's Twine - Brown and White

Thanks for stopping by!
Jen
:-)

Thursday, June 13, 2013

Love you to the Moon and Back

A quick fun card for a young boy...


 Easy Peasy panels of patterned paper from the 6 1/2" paper pad, add some collectibles adhered with foam tape... I also added a bottle cap  to draw the eye as it's the only other texture on the card :-)

Ingredients:
Twiddleybitz - square card and envelope, white
Kaiser - Blast Off 6 1/2 inch paper pad from My2Angels
Kaiser - Blast Off Collectables from My2Angels

Thanks for stopping by!
Jen
:-)

Friday, June 7, 2013

Cherish... pop-up card

I love interactive cards!  I made my own pop-up card using the new Kaiser Papers - True Romance.  I used the 6" paper pad and the collectables.

It's so much easier to 'fussy cut' with the collectables instead of doing it by hand!!

A few slits here and there and hey presto - you have a pop-up card.

Ingredients:
Twiddleybitz white card and envelope, square
Kaiser - True Romance Paper Pad
Kaiser - True Romance Collectables
My Favourite Things - Dienamics, Open Scallop Doily

My Favourite Things - Dienamics, Open Scallop Border
Ranger/Tim Holts Distress Ink - Brushed Corduroy
Foam Tape

Thanks for stopping by!  If you've created a pop-up card recently, I'd love to see it - pop a link in the comments below and I'll come and visit!!  If you haven't - get cracking!

Jen
:-)

Monday, June 3, 2013

FWABulous!

Recently my term on the Flourish With A Bling Design Team finished.  I have enjoyed my time on the FWAB team immensely, Maggie, Kate, and Lucy are wonderful ladies whom are so very supportive!  I was a little amazed when I looked back on my blog and saw over 90 projects created using FWAB products over almost 2 years!

It has been an absolute honour to work alongside the other talented designers on the team and I have made some great friends!  I wish Flourish With A Bling, Maggie, Kate, and Lucy, and the new Design Team the best of success.  I'm sure it'll be another FWABulous year!

I'll say goodbye with a few of my favourite FWAB projects - that's if I can manage to limit it!!

Jen
:-)


Saturday, June 1, 2013

Remember This Moment

I had a great time getting messy with this!  I wanted to use more than one photo on the layout as a recent request from Twiddlyebitz DT Bosses called for multi-photo layouts!

I sponged distress ink though the Twiddleybitz Chicken Wire template onto the background and overstamped with a compass stamp from Darkroom Door's Discover, Essentials 9 Collection.
I altered the chicken mesh wire using Claudine Hellmuth Multi-medium gloss.

 The more I added, the more it clumped nicely to represent the seaweed and stuff hanging from the net in the photos.

I force-dried it with my heat-gun and sprayed it it with an array of mists...

I used the Stampendous Aged Ivory Embossing Enamel on my title and the new Sunfish - both Twiddleybitz chipboard pieces.  I added a charming chain, some shells, and some sugar beads.

Near the Sunfish I added an Elise Antique Brown Rhinestone Flourish, Sugar Beads and Charms, and a ticket made from the Kaiser ticket stamps and Tim Holtz die.  I'm happy I managed to journal along the bottom of my page using a Distress Marker, and added a date as well using the Grunge Charming Date bottle top from My2Angels.

Ingredients:
Background:
The Paperloft Sanded Geometric Series Patterned Paper
Darkroom Door Rubber Stamp - Discover (DDRS090) from Essentials Nine Collection
Ranger/Tim Holtz Distress ink - Brushed Corduroy
Tsukineko Stazon Ink - Timber Brown
Twiddleybitz Chicken wire stencil
Ranger/Tim Holtz Distress Marker - Walnut Stain

Embellishments:
Twiddleybitz - Chicken Wire (WIR002)
Twiddleybitz - Remember This Moment Word (WOR086)
Twiddleybitz - Sunfish (SEA005)
Claudine Hellmuth - MultiMedium Gloss
Assorted Lindy's Stamp Gang Starbusts
Ranger - Emboss It Dabber
Stampendous - Aged Ivory Embossing Enamel
Flourish With A Bling - Rhinestones Elise Antique Brown
My2Angels - Sugar Beads
My2Angels - Charms; Starfish, fish
My2Angels - Charming Chain - Family
My2Angels - Date Bottle Cap
My2Angels - Bakers Twine
Kaiser Ticket Stamp - Explore
Tim Holtz Ticket Die

Tsukineko Stazon Ink - Black
Miscellaneous Doily
Miscellaneous Corner Punch

Thanks for stopping by!!
Jen
:-)